Let’s get straight to the point: you should be stretching. It’s good for your health, form, joints and flexibility (1). In fact, just to maintain your current joint mobility and flexibility, you should stretch at least 3-4 times a week in 15 minute sessions. To actually improve your flexibility, you should be stretching 5-6 times a week in 15-30 minute sessions. In this 2-part guide we’ll illustrate 53 exercises that include every major muscle group – all to get you start stretching.
Today, stretching seems to be a forgotten art. Except in yoga (where it is instrumental), it is mostly relegated to a few minutes before or after exercising. It is often mistaken for a warm-up, even by seasoned athletes. Yet, just like warming-up, stretching has its own important place (2). Regular stretching will improve your shape, form, flexibility and overall quality of life – now, and as you age.
How to Stretch
There are several types of stretching:
- Static stretching (which can be passive or active), where we take the joint close to its limit and keep the stretch for a few seconds;
- Dynamic stretching, which can be divided to ballistic stretching (using movement inertia to go beyond normal range of motion) and guided stretching (using controlled movements); and
- Proprioceptive Neuromuscular Facilitation (PNF), where we perform isometric contractions with moments of relaxation.
As this guide is meant for beginners, we’ll stick to the core movements which are sufficient for most individuals, bar professional athletes.
The process of stretching involves taking your joints close to their limits. You should push your stretch until you start feeling a discomfort. Proper stretching forces mobility, but without reaching pain. This is because too light a stretch produces no results, while too extreme stretch can cause injury. A smart stretch is controlled and continuous, walking a fine line between feeling a discomfort (sometimes a pleasant one) and pain, building on the former, but never reaching the latter.
You can try to take the joint close to its limits and hold it there. It can be difficult for beginners to find that point, but with some experience it will become easier – just listen to your body. Generally, the discomfort should subside in 3-4 seconds and an almost pleasant feeling can appear.
Starting Stretching
Just like any workout, you should warm-up before beginning to stretch. Warming-up increases blood flow and elevates body temperature – nourishing and oxygenating tissues you are about to stretch.
Depending on whether your aim just stretching, or stretching and working out (3), this is how your session should look like:
Warm-up – Stretch – Workout – Stretch (note that stretching for recovery has little scientific support)
or
Warm-up – Stretch
Many people include stretching before working out because the were told that this will prevent injury. However, there is no basic science evidence to suggest that stretching would decrease injuries. On the other hand, there are some basic science data to suggest that a warm up may help to prevent injuries (4). Don’t mix the two and do some research before planning your sessions.
You can start warming-up with some light 5-10 minutes aerobic activity to get the blood flowing, followed by a few minutes of joint movements and possibly some resistance movement of your targeted muscles. After warming-up, continue with stretching.
Unlike strength training, it is preferable to stretch all major muscles during each stretching session, rather than dividing them into different days. Since we’ll provide several stretches for each major muscle in this guide, try changing the exercises each week to keep the routine interesting. If, however, time does not allow to stretch all muscles in one session, you may divide the workout in two and follow up the next day with any muscles that were left out the previous day.
You’ll notice some of the stretches here require a stretching partner. A partner can help you reach the best stretch possible and keep the session fun and interactive instead of a lonely, earbuds on affair. This does come with a challenge, though – your partner must be of a similar build and shape and there must be an intuitive understanding between the two of you.
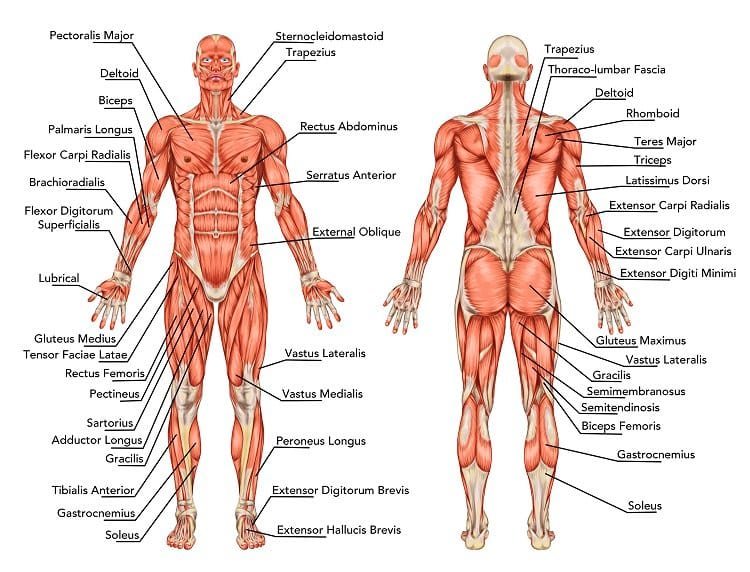
Before you begin stretching, you’ll need a passing familiarity with anatomy. As we mention many muscles by names in this article, we are providing these two illustrations showing most of the muscles you’ll be stretching. When not sure which muscles are being discussed, refer back to the following illustrations below:
As always, the usual warnings apply: if you have any injuries consult with a doctor if this workout is for you, and stop doing exercises that cause you pain.
All stretches described here should be repeated between 3-6 times, holding each stretch for at least 30 seconds.
Enjoy!
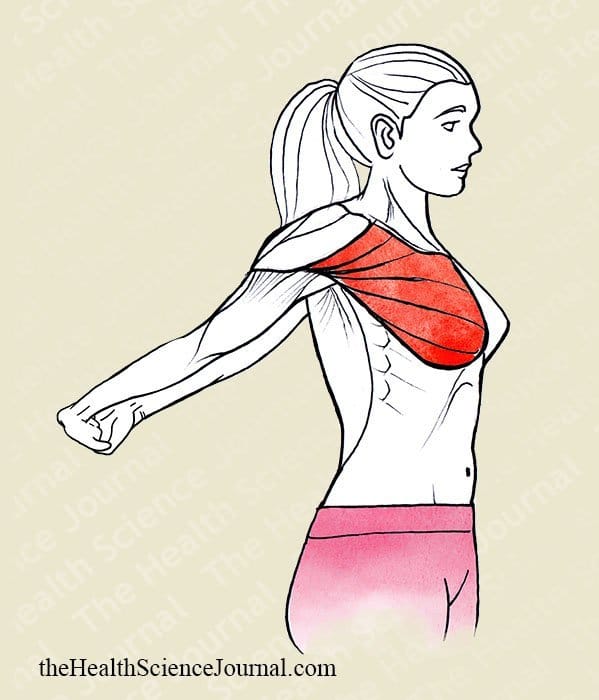
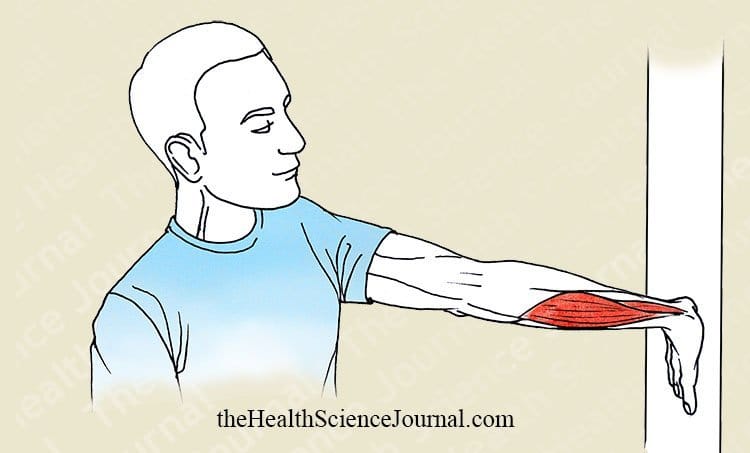
1. Chest Stretching Against a Corner
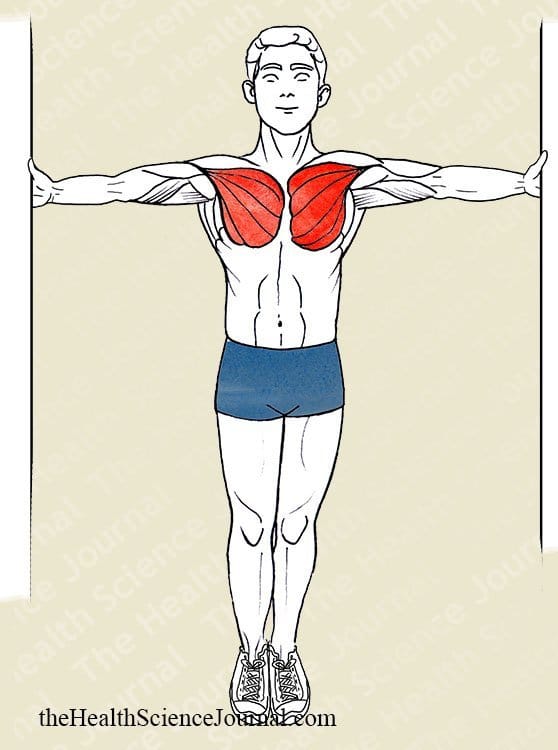
Chest Stretching Against a Corner – Stretching – www.thehealthsciencejournal.com
Muscles involved: Pectoralis major
Instruction:
Stand in front of a corner of a wall, raising your arms to shoulder height (90° abduction) and lean forward, bringing your core gradually closer to the corner.
Commentary:
This fairly simple stretching exercise involves both pectoralis majors, as well as the anterior portion of the deltoids and the arms. If the elbows are flexed and the push is done through the elbows, then the arm flexor muscles will not undergo any stretching.
A common mistake while performing this exercise is to remain with the feet stationary allowing the torso to fall forward. The proper way to do this is to move forward slowly with small steps, bringing the entire body closer to the corner with the arms raised, or else you would be forcing the pectoralis muscles to contract in order to maintain the posture, when what we were aiming to do is relax them so they may be properly stretched.
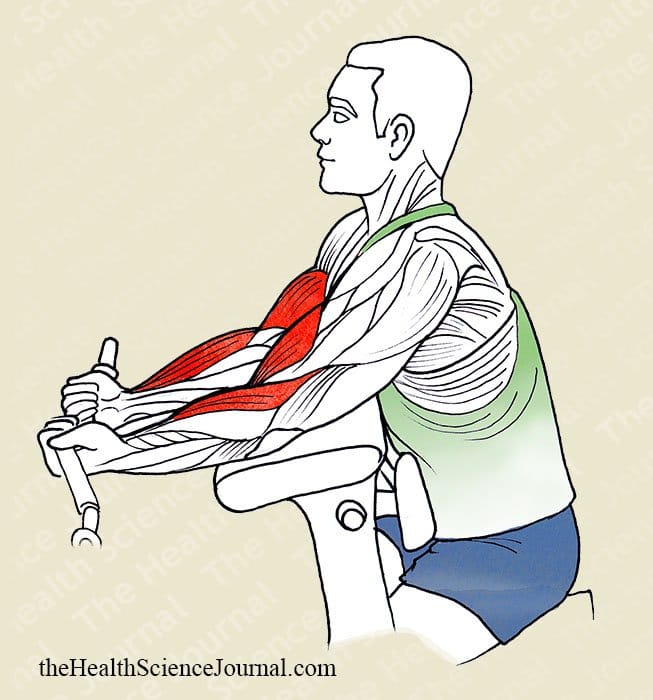
2. Back to Bar Chest Stretching
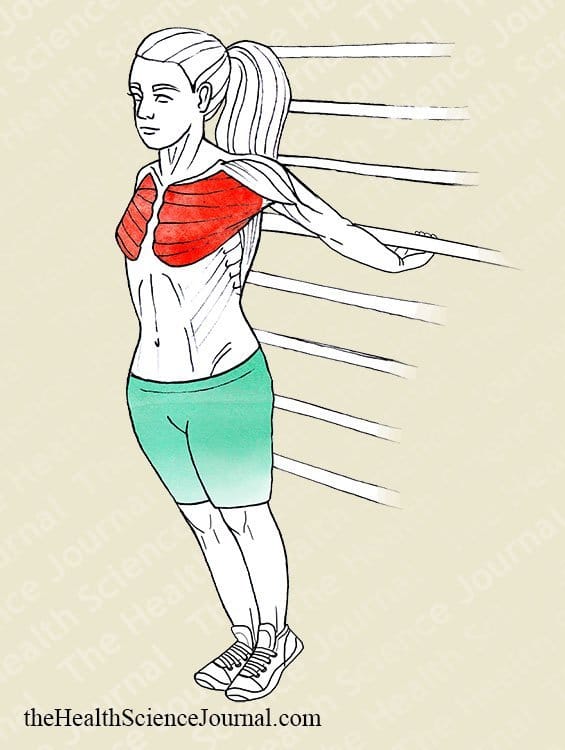
Back to Bar Chest Stretching – Stretching – www.thehealthsciencejournal.com
Muscles involved: Pectoralis major and subscapularis
Instruction:
While standing, hold a bar behind you with a the palms facing backward (pronated grip) and slowly let the body fall forward and downward.
Commentary:
The pronated grip is important as it allows you to avoid having the movement hindered by the elbow flexors, such as the biceps brachii. If you change to a supine grip, then you are stretching these muscles as well, something that must be done with special caution.
This position and the movement mean that the deltoids and other minor muscles of the shoulder are also worked, particularly in the anterior (front) region of the shoulder.
One thing to note is that if the bar is placed too low, then the movement of the torso needs to be accompanied by a progressive bending of the knees, allowing for a greater extension of the arms.
[adinserter block="2"]
3. Hyperextension of Shoulders
Hyperextension of Shoulders – Stretching – www.thehealthsciencejournal.com
Muscles involved: Pectoralis major and subscapularis
Instruction:
While in a standing position, hold a wooden bar behind the body with a pronated grip (palms facing backwards). Little by little, elevate the arms in extension until you are able to feel the stretch in the chest region.
Commentary:
Like before, by using a pronated grip we prevent the movement from being slowed by elbow flexors, which would obtrude more intensely if we held the bar with a supinated grip.
This exercise is similar to the Back to Bar stretching, but now it is the movement of your own muscles, rather than gravity, which creates the traction. Similarly, the position and the movement also make the shoulders work, especially the anterior portion of the deltoids. As with various other stretching exercises, refrain from bouncing movements.
4. Chest Stretching With Assistance
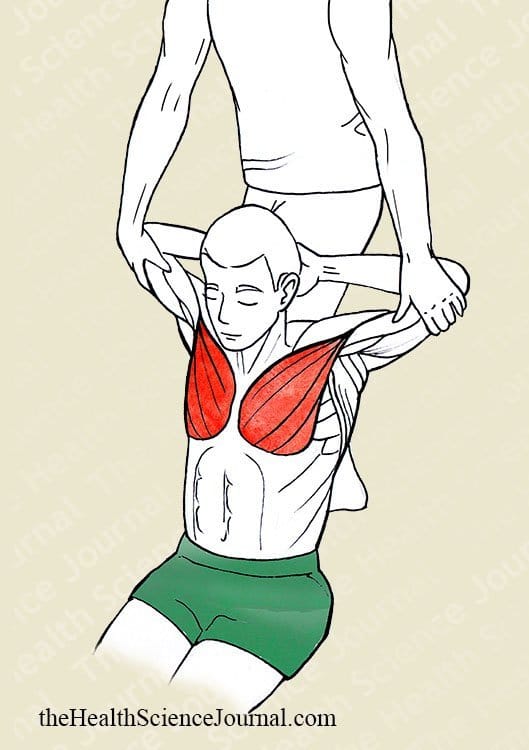
Chest Stretching With Assistance – Stretching – www.thehealthsciencejournal.com
Muscles involved: Pectoralis major
Instruction:
You can be seated either on the ground or on a bench. Place your hands behind your head in a pronated grip with the elbows at the height of the head. Your partner should stand behind you and grab a hold of both of your hands and pull them simultaneously upward and backward, keeping your back still against his/her legs.
Commentary:
Note that now we are using a pronated grip.
As with all stretching exercises for pairs, the force that the partner applies should be precise. The partner must monitor and closely follow the reactions of the person who stretches, assessing the limits of mobility with extreme caution. The correct way to assist in the performance of this exercise is to grab hold of the arms, not the elbows, around the lower triceps area. When assisting, you shouldn’t push the knee into the back – this can force an arching of the back.
5. Passive Stretch on a Contraction Machine
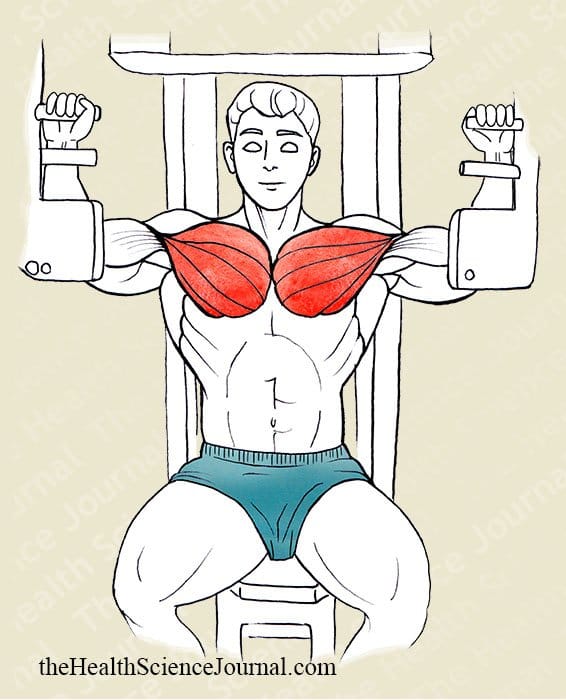
Passive Extension on a Contraction Machine – Stretching – www.thehealthsciencejournal.com
Muscles involved: Pectoralis major
Instruction:
Seated in a Pec-deck (fly machine) with the elbows resting on the pads, choose a suitable load and lift the weight with the legs. Proceed by slowly releasing the load with the legs to transfer it to the arms, passively, until it is the arms that are resisting all the weight. The stretch is finished by releasing the load once more with the legs.
Commentary:
This is a very simple and very effective stretching exercise, but note that the machine has to have a built-in load release mechanism, or you are just begging to get injured. Additionally, it is not necessary to put a lot of weight on the machine for this exercise to be effective, unlike when using this equipment as part of a strength building routine.
[adinserter block="3"]
6. Arm Extension With Assistance
Arm Extension With Assistance – Stretching – www.thehealthsciencejournal.com
Muscles involved: Pectoralis major
Instruction:
A partner standing behind you should hold the torso with one hand and use the other hand to lift your arm backward and up.
Commentary:
The benefits of this exercise will be better if your stretching partner is strong enough to maintain the posture. Similarly, the partner must attempt to keep the person stretching from twisting the torso, since doing so will nullify the stretching effect you are trying to achieve. If the traction is on the forearm, forcing the subject to extend the elbow, it will also bring the elbow flexors into play. Alternatively, if the traction is from the elbow, the stretch will be much more isolated to the pectoral region.
7. Overhead Arm Extension
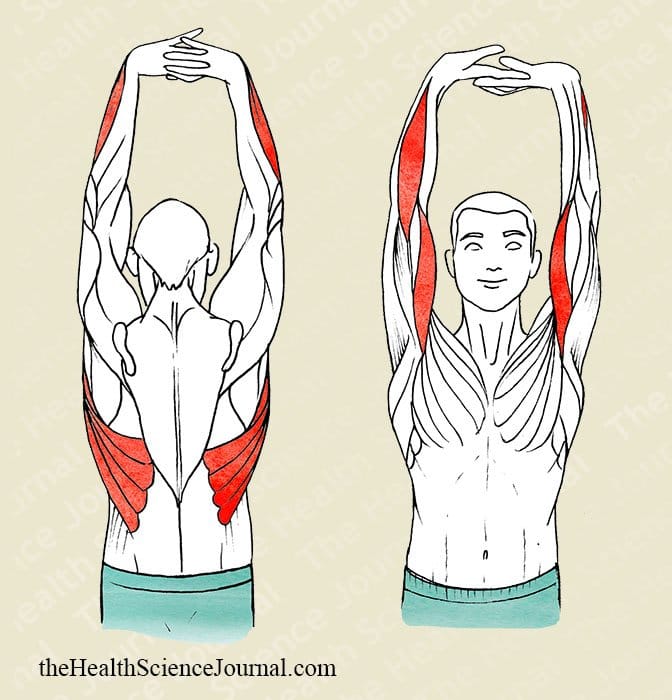
Overhead Arm Extension – Stretching – www.thehealthsciencejournal.com
Muscles involved: Latissimus dorsi, teres major, finger flexors (flexor digitorum superficialis and profundus and flexor hallucis longus), flexor carpi ulnaris, long and short palmar muscles
Instruction:
While standing, preferably in front of a mirror, raise your arms above your head, with fingers interlocked and palms facing upward. Just stretch as if you are trying to reach the ceiling.
Commentary:
This exercise also involves the flexor muscles of the hands. Unlike some previous exercises, this is an exercise that can be performed by people of advanced age and those with certain physical disabilities, depending on the type and degree of the disability. These two groups of people can omit interlocking the fingers if it presents a problem.
On this exercise, some people tend to stand on the tips of their toes, trying to stretch even more parts of the body. While not harmful, it may disrupt the person’s concentrating and thus compromising his/her stability.
8. Bending on a Bar
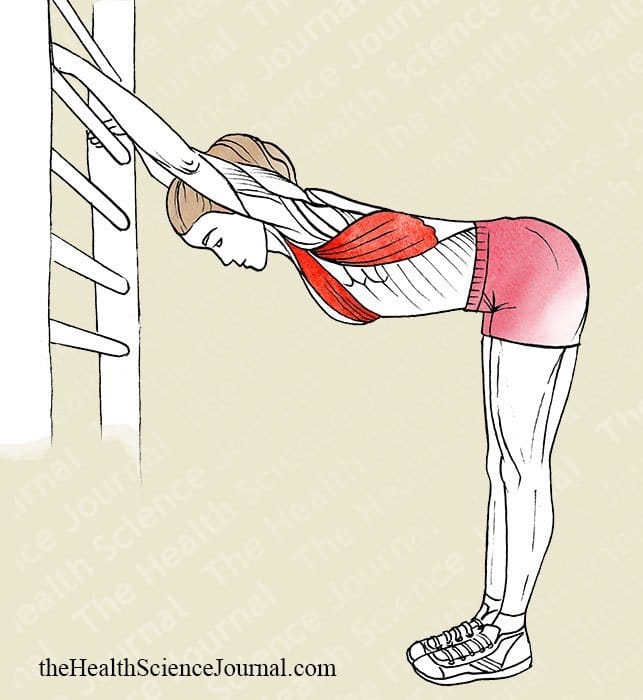
Bending on a Bar – Stretching – www.thehealthsciencejournal.com
Muscles involved: Latissimus dorsi, pectoralis major
Instruction:
Start in a standing position and facing a support that is higher than your waist. Now flex your torso and rest the hands on the bar above it, preferably with the arms externally rotated, as in the pic. Keeping your arms immobile, lower the torso even farther until you start to feel the stretch in the target area.
Commentary:
If your target is the latissimus dorsi muscle, you can get even more of a stretch by performing this movement with a slight external rotation of the arms. Consequently, it may be more comfortable to perform this exercise while holding on to vertical bars rather than over a horizontal bar or flat surface. This will also allow your body to hang back a little bit more, so that you are farther from the support and the stretch can go a bit further.
9. Brooklyn Bridge Stretch
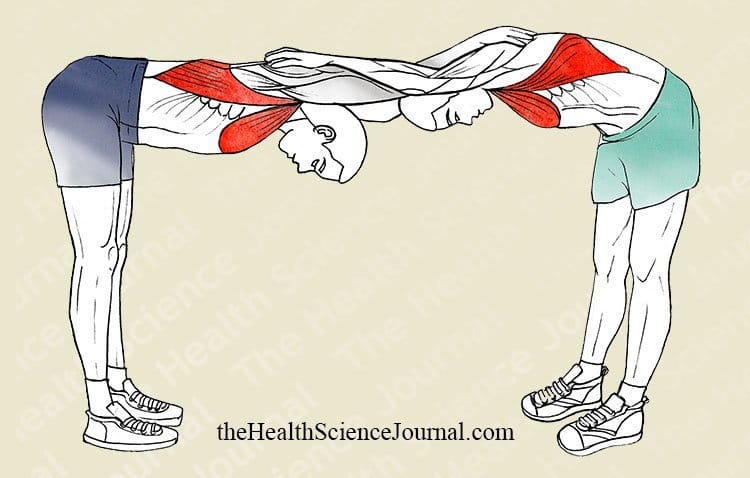
Brooklyn Bridge Stretch – Stretching – www.thehealthsciencejournal.com
Muscles involved: Latissimus dorsi, pectoralis major
Instruction:
Standing up and facing your training partner, hold each other by interlocking your arms with the palms over or slightly below each others shoulders. Then flex 90° at the waist and pull backwards and down simultaneously.
Commentary:
For the Brooklyn Bridge Stretch, both partners should be of a similar height and weight. If there is too much of a height or weight difference, just perform a different exercise instead. If the pull backwards is too strong the partner will also have to exert himself to compensate, preventing the necessary relaxation for stretching. Instead, more pressure should be applied downward.
10. Back Arm Lock
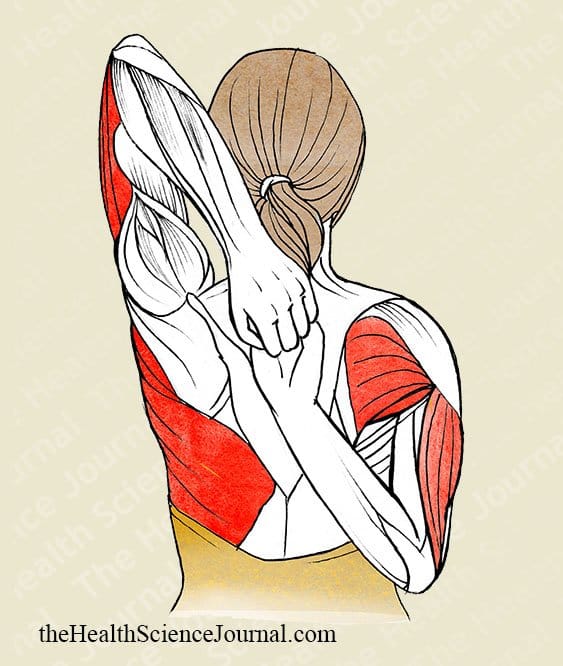
Back Arm Lock – Stretching – www.thehealthsciencejournal.com
Muscles involved: External and internal rotators, triceps
Instruction:
You can perform this exercise either standing, or seated on a backless bench. Raise one arm over and behind the head while the other goes behind the back from below. Join the hands by trying to grab the fingers, somewhere behind your upper back.
Commentary:
With the Back Arm Lock, the mobility of the shoulder joint is easily determined. Advanced stretchers will have no difficulty joining their hands, and some may even reach the forearms. Novices will need some help in order to join the hands. A training partner can be very handy, standing behind the person doing the stretching and pushing gently upon the elbows in an effort to bring the hands closer together. With each repetition, try to slightly change the position of the arms in order to balance the stress upon the structures being stretched.
11. Bench Dip
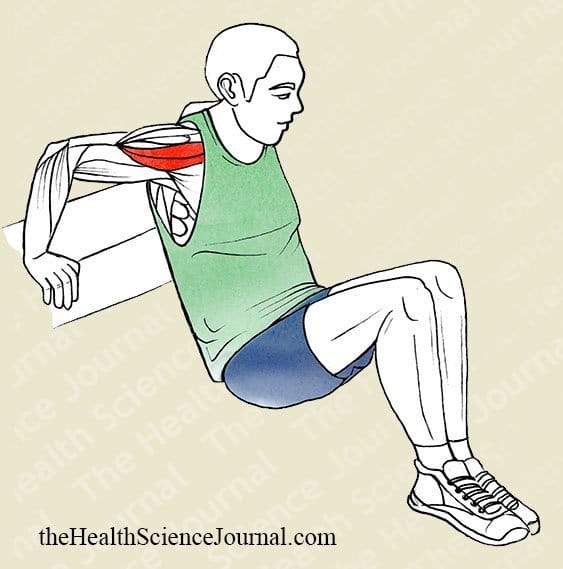
Bench Dip – Stretching – www.thehealthsciencejournal.com
Muscles involved: Anterior deltoids
Instruction:
Sitting horizontally on a flat bench with your hands on the edge of the bench, move slightly away from the bench and then lower the torso down to the point where the arm forms a 90° angle with the bench. Your feet must remain firmly in place, supporting the majority of the body weight.
Commentary:
In contrast to the muscle building exercise, which targets the triceps and deltoids, here we want to focus mostly on the anterior deltoid muscle and on maintaining the position rather than any movement. While this exercise stretches the target muscles, having to support the body at the same time takes away from the effectiveness of the stretch, as a muscle that is contracting cannot at the same time be relaxed for stretching. Hence, this exercise will better serve to distend the specified muscles after a session of physical exercise, than be used as a true stretching exercise during a session aimed specifically for stretching and improving mobility.
[adinserter block="4"]
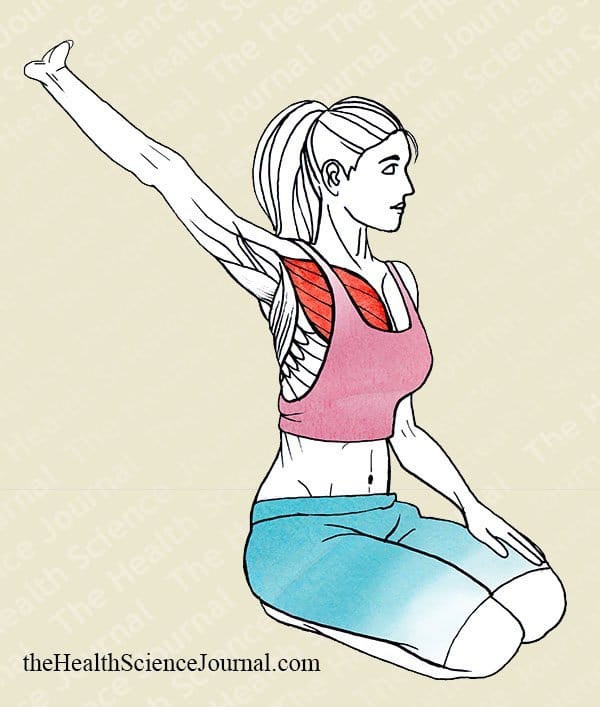
12. Rotating Shoulder Stretch
Rotating Shoulder Stretch – Stretching – www.thehealthsciencejournal.com
Muscles involved: Anterior deltoids
Instruction:
Standing up next to a vertical bar (or other surface or object), hold on to it with the arm that is farther away from it. Rotate your torso without letting go of the bar, so that you can feel the stretch along the back of the arm that holds the bar. Remember to keep the arm completely horizontal, with the hand gripping the bar at shoulder height.
Commentary:
The Rotating Shoulder Stretch is designed to stretch the rear portion of the shoulder and is very beneficial for preventing the contractures that occasionally develop in the area. Furthermore, these types of stretches are a perfect complement to massages aimed at eliminating any muscle hardening. The only difficulty lies in not tensing the entire arm, but rather just the hand in its grip. Think of the hands as simple hooks that are fixed and immobile and you’ll have no trouble.
13. Parallel Bar Dip
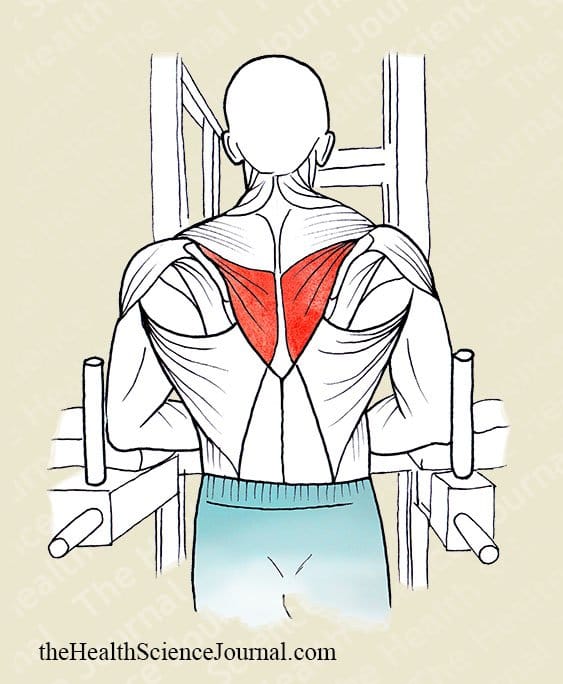
Parallel Bar Dip – Stretching – www.thehealthsciencejournal.com
Muscles involved: Pectoralis minor, lower trapezius
Instruction:
Using a padded parallel machine (dip station, dip frame), rest your elbows and forearms on the pads to support yourself and let your body hang down passively. The head can be in line with the shoulders, but for a better stretch flex the head slightly forward, allowing the shoulders to come up beside it.
Commentary:
This is a very simple exercise that aims to stretch some muscles that are not regularly stretched by conventional stretching exercises. In this position, the spinal column is placed in a discharge position, which is very beneficial to alleviate any tensions that build up in it. People with spinal deviations, particularly scoliosis, should include this exercise in their routine. Due to its simplicity, Parallel Bar Dip can be performed by both beginners and experienced individuals.
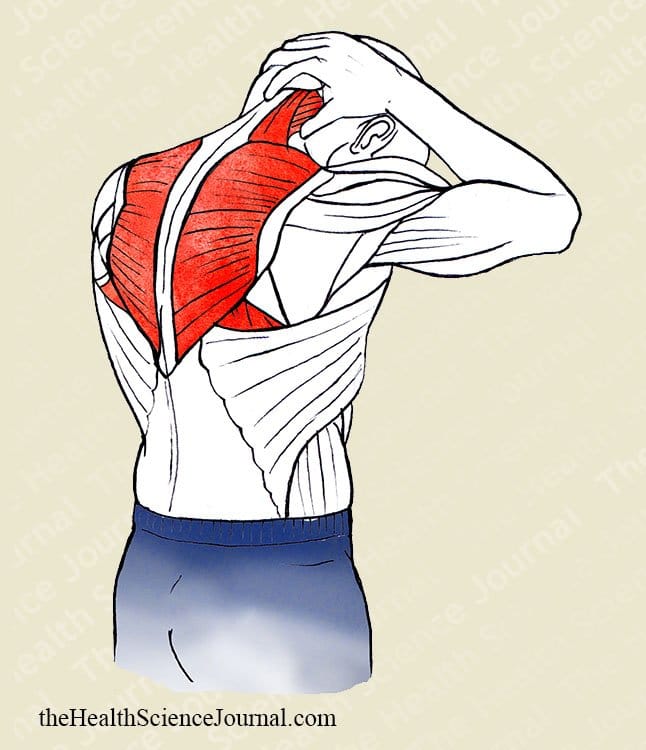
14. Hands-Head Flexing
Hands-Head Flexing – Stretching – www.thehealthsciencejournal.com
Muscles involved: Semispinalis, splenius, spinalis, splenius cervicis, spinal erectors, trapezius
Instruction:
Either standing or, preferably, sitting down, allow the head to fall gently forward, with the aid of both hands placed on top of each other in the upper-back area of your head. It is not necessary to apply force with the arms – the pressure from their weight on the back of the head is enough for a stretch.
Commentary:
During the exercise, it may occur that the cervical (neck) muscles suddenly tense up to prevent the head from falling forward. To avoid this, the movement must be performed very slowly. Only at the very end of the movement you can relax the area to allow the force of gravity perform the stretching. Meanwhile, the rest of your back maintains its normal straight posture.
To focus on the small extensor muscles of the head (neck area) – and not those of the spine farther down – the turn must be done at the base of the skull with the chin close to the neck and gripping the head higher-up with the hands.
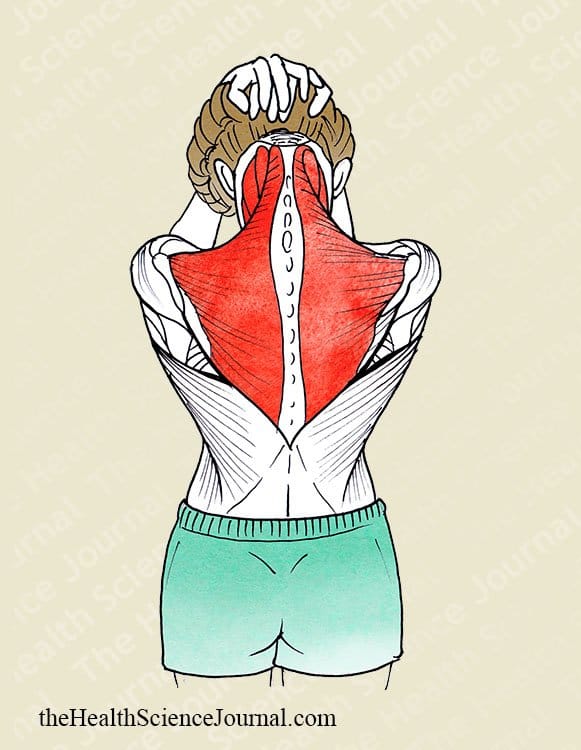
15. Head-Neck Flexing
Head-Neck Flexing – Stretching – www.thehealthsciencejournal.com
Muscles involved: Trapezius, semispinalis, splenius, spinalis, spinalis cervicis, spinal erectors
Instruction:
Seated or standing, place your palms behind your head and bend it downward and forward in a VERY gentle and sustained motion.
Commentary:
This exercise is very similar to Hands-Head Flexing, but here it is not just a matter of flexing the head down. You are holding the head with the whole area of the palms and pulling it forward as well. This movement also stretches the larger muscles, such as the trapezius, as well as the lower areas of the cervical (neck) spine. Tension will be felt in the lower cervical vertebrae, as well as in the muscles that surround the neck along the sides and back. Don’t elevate the shoulders, as this would reduce the effectiveness of the stretch. As with all head and neck exercises, the movements should be especially slow and controlled.
[adinserter block="2"]
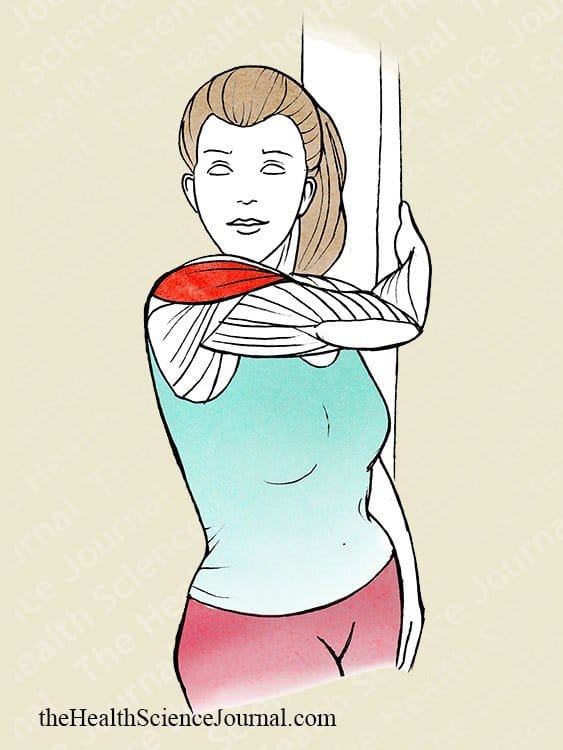
16. Fixed Arm Rotation
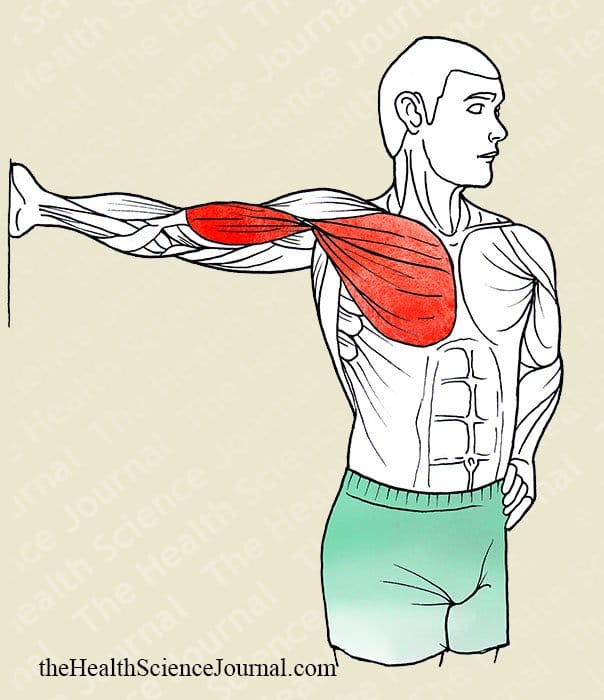
Fixed Arm Rotation – Stretching – www.thehealthsciencejournal.com
Muscles involved: Biceps, pectoralis major
Instruction:
Standing beside a wall or a door, raise the arm sideways until shoulder height, with the palm of the hand turned so that it lies on the frame of a door or the corner of a wall. The elbow always remains extended. Relaxing the arm and the chest region, rotate your torso in the opposite direction of the extended arm as you slowly feel the stretch intensifying.
Commentary:
Fixed Arm Rotation is performed with the elbow always extended in order to achieve a good stretch of the biceps. When executing this movement, you should feel the tension in the biceps brachii. If the tension is somewhere else, you are performing the exercise incorrectly. In such a case, try modifying your posture and arm position and begin the stretch again until you feel the biceps stretch.
17. Arm Hyperextension
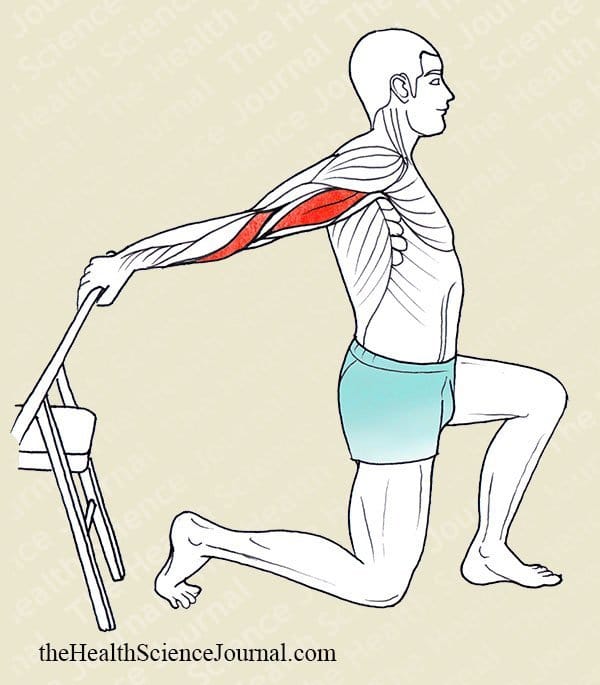
Arm Hyperextension – Stretching – www.thehealthsciencejournal.com
Muscles involved: Biceps brachii, brachioradialis
Instruction:
Standing up with your back toward a fixed support of approximately shoulder-height, the elbow extended and the arm internally rotated (the thumb going inwards), rest the back of the hand on the support. Now, slowly lower your torso until you can feel the stretch around the biceps.
Commentary:
Again, it is not enough to simply extend the elbow in order to stretch the biceps, there should be a movement of the shoulder. This exercise, if performed slowly, manages a good stretch of the biceps. In fact, it is one of the most effective biceps stretches from the exercises not requiring partner assistance. Due to the position of the arm and the movement performed, the anterior portion of the shoulder is also stretched.
[adinserter block="3"]
18. Hanging From a Bar (Supinated Grip)
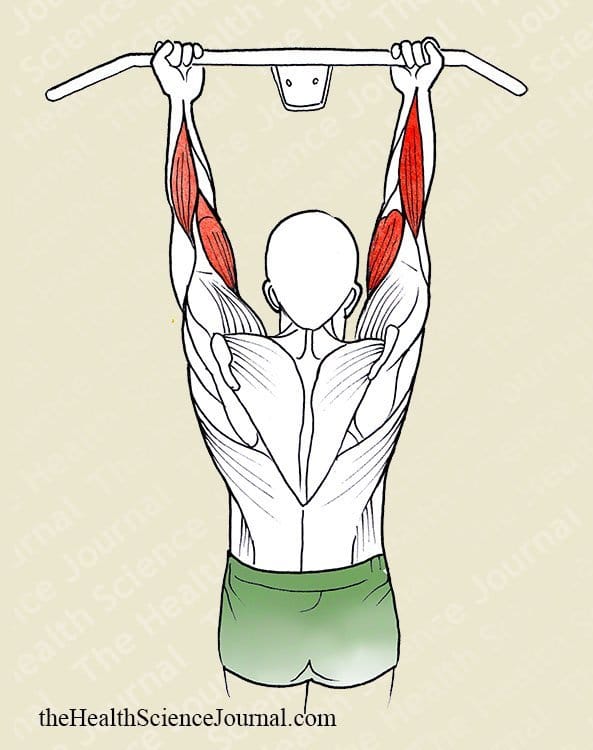
Hanging From a Bar (Supinated Grip) – Stretching – www.thehealthsciencejournal.com
Muscles involved: Biceps brachii, brachioradialis
Instruction:
With arms externally rotated and the palms of the hands facing backwards, hang suspended from a horizontal bar. Relax the body during the few seconds that the stretch lasts and then land on the ground in order to “release” the muscles.
Commentary:
This is exactly like the starting position for performing “chin-ups” for the back and biceps. And it is precisely this pair of muscle groups, the back muscles and the elbow flexors, that are being stretched. What is important here is knowing how to relax your body and not maintaining a constant tension in the arms. A tension would prevent an effective stretching of the arms. Try using only the forearms and hands to support the weight of your body.
As an alternative, you can try to hold on to a lower bar and keep your feet on the ground. Now progressively remove your body weight off the feet until your whole body is hanging, even if your feet may still be touching the ground.
19. Preacher Bench Passive Biceps Stretch
Preacher Bench Passive Arm Extension – Stretching – www.thehealthsciencejournal.com
Muscles involved: Biceps brachii, brachioradialis
Instruction:
While on a preacher bench, hold the bar with the palms facing upwards (supinated grip), place your elbows on the pads and let the arms extend until they reach the point of maximum extension.
To finish, do not simply return the weight up by flexing the elbows, but rather leave the bench completely, so that you are more comfortable and it is less compromising for the joints.
Commentary:
Remember, this is a stretching exercise and you should not load the bar with too much weight. The extension should be slow and controlled, otherwise you could be damaging the joint at the bottom of the movement. Perhaps not the biceps itself, but the olecranon, the joint capsule, the humeral artery or certain ligaments.
For those people who find that the regular bar (~8 to 10 kg) is too heavy, look for a lighter bar, but never use dumbbells because it would be much harder to maintain full supination of the forearms, which is necessary for stretching the biceps.
20. Overhead Arm Hyperextension
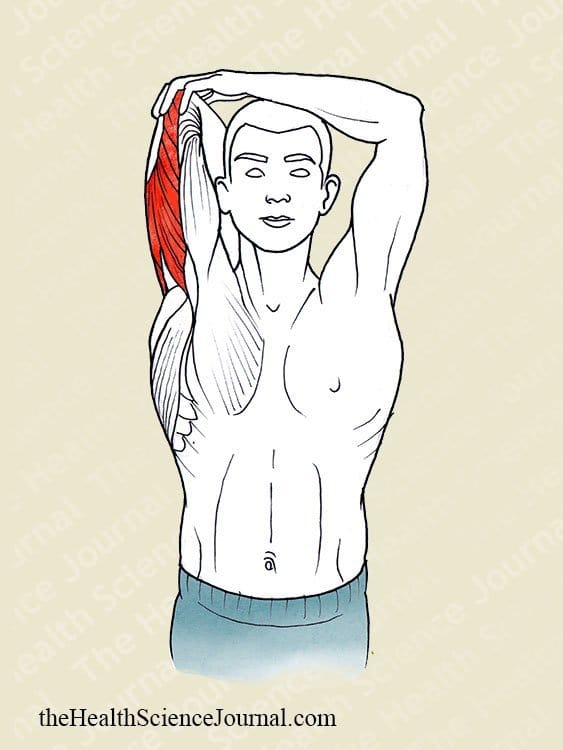
Overhead Arm Hyperextension – Stretching – www.thehealthsciencejournal.com
Muscles involved: Triceps brachii
Instruction:
Either standing up or sitting down in front of a mirror, completely bend the elbow and raise the arm by flexing the shoulder, while using the opposite hand to push the elbow backward.
Commentary:
There is a tendency to rest the helping arm on the head as a kind of lever, which could put pressure on the cervical (neck) spine. While this help could be useful if done correctly, care must be taken not to adopt a poor posture with the neck.
It is imperative to flex the elbow maximally (hence the hyperflexion in the name), yet it is not uncommon to see people who, as they push farther back, the elbow joint is progressively relaxed and extended, taking away from the stretching of the triceps. This is where a help from a training partner can be worthwhile – all he or she has to do is ensure that the elbow remains totally flexed and push gently on it toward the back.
21. Frontal Elbow Extension
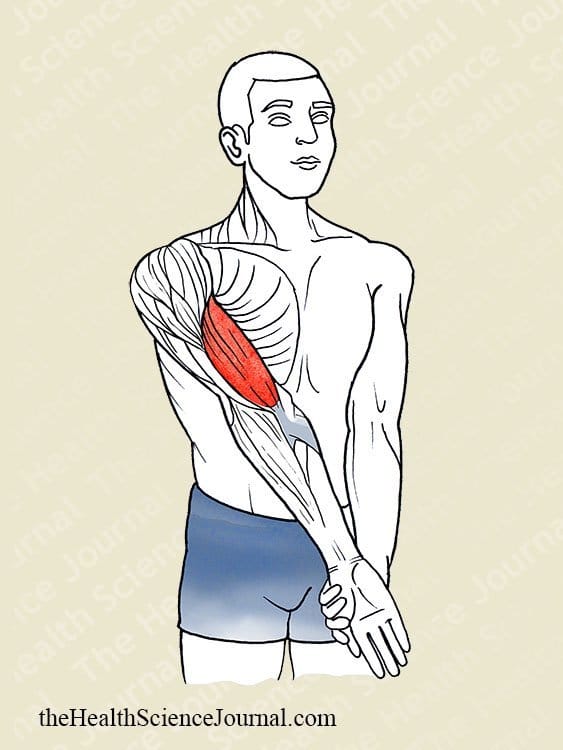
Forward Elbow Extension – Stretching – www.thehealthsciencejournal.com
Muscles involved: Biceps brachii
Instruction:
Stand before a mirror stretching the elbow in front of you and force the pronation of the forearm with your other hand.
Commentary:
This exercise might look simple, but the biceps does not require more demanding stretches, as it works well within the regular ranges of motion, and rarely encounters abnormalities in its mobility (which are much more frequent with many other muscles).
22. Frontal Arms Extension
Frontal Arms Extension – Stretching – www.thehealthsciencejournal.com
Muscles involved: Flexors of the fingers (deep, superficial, and the long flexor of the thumb)
Instruction:
Interlocking the fingers with the palms facing outwards, turn the forearms and extend the elbows in front of you. As you approach maximum extension of the elbows, you will feel the tension in the anterior part of the forearms.
Commentary:
A very simple exercise, appropriate for anyone working intensely with their hands, like IT sector, construction workers, manual workers, etc.
[adinserter block="4"]
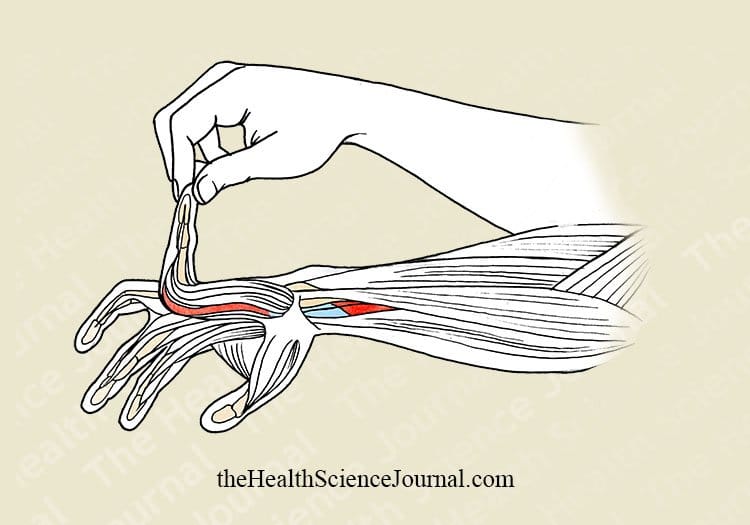
23. Extension of the Hands Facing a Wall
Extension of the Hands Facing a Wall – Stretching – www.thehealthsciencejournal.com
Muscles involved: Flexors of the fingers (deep, superficial, and the long flexor of the thumb)
Instruction:
Standing in front of a wall with the arms extended and the fingers coming downwards, press lightly forward until the entire surface of the palm is resting on the wall. The arms should be raised until almost shoulder height as the image demonstrates.
Commentary:
By extending the elbows, you will stretch all of the muscles of the anterior part of the forearm, whereas if they remain partly flexed, the effort is centered on the small flexor muscles of the hand and fingers. The way to increase the intensity is to place the hands somewhat higher on the wall and then press lightly with the hand resting on the wall.
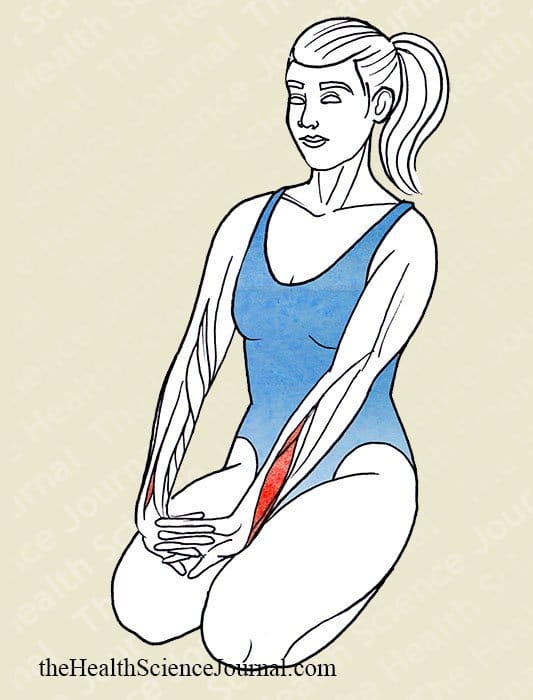
24. Prayer Hand Extension
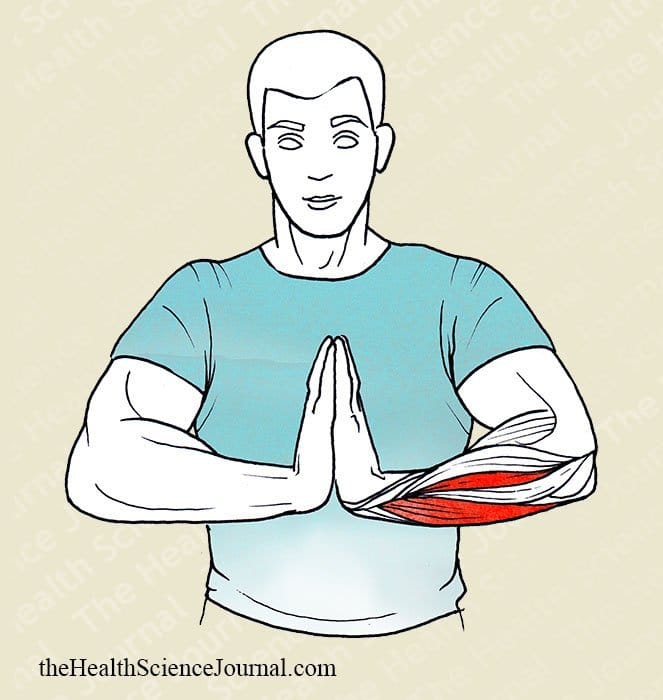
Prayer Hand Extension – Stretching – www.thehealthsciencejournal.com
Muscles involved: Flexor digitorum profundus, abductor pollicis, flexor policis longus
Instruction:
Standing or sitting, preferably in front of a mirror, place the hands with the palms facing each other, in “prayer” position, and press your palms against each other. At the same time, lower the hands little by little towards the abdomen, without letting them pull apart.
Commentary:
This is an easy exercise that can be performed at any point during the day – like the rest periods during long-lasting manual labor, perhaps. However, it is important to have variety into your stretching program. This one exercise is not a substitute for all other exercises stretching the fingers because it does not stretch all of them equally (with the middle fingers being stretched more).
25. Finger by Finger Stretching
Finger by Finger Stretching – Stretching – www.thehealthsciencejournal.com
Muscles involved: The flexor muscle corresponding to the finger being extended
Instruction:
A simple exercise, performed by holding each individual finger with the other hand, and extending it to its maximum movement. The stretch is maintained for a few seconds, and then one moves on to the next finger.
Commentary:
Even though this is a simple exercise, the pulling movement must be slow and sustained, as it is not hard to injure a structure by doing otherwise.
You might be tempted to think that stretching each finger individually is a waste of time, compared to stretching them all together. That would be a mistake, since there is nothing more effective than dividing up the body areas as much as possible in order to obtain the best results from stretching. Specific exercises designed for a specific muscle are the best way to increase the flexibility of that muscle.
NOTE: You can find the Second Part of this guide, containing 28 more stretches, here: Starting Stretching, Part 2.