
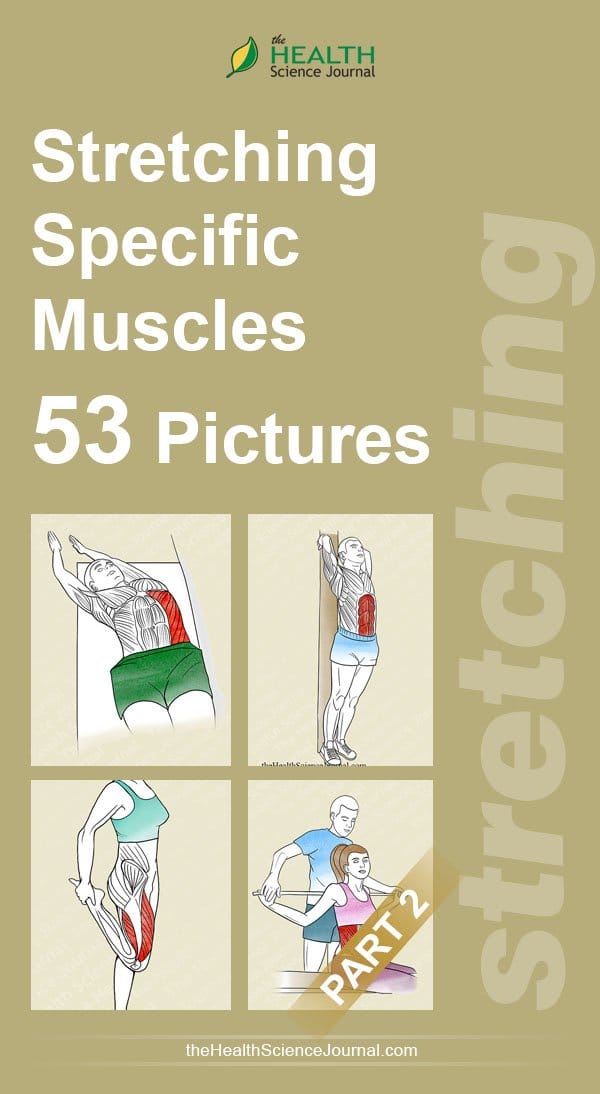
Welcome to Starting Stretching, Part 2. Because of its size, we had to divide this guide in two parts. In Part 2, we continue with specific stretches for fingers, arms, core, legs and toes, concluding our guide with the last, 53rd stretch at the bottom.
To find the first 25 stretches of Starting Stretching along with workout instructions and muscles chart, please visit Starting Stretching – 53 Full Body Stretches for Beginners, Part 1.
Stretching is clouded by misconceptions and conflicting reports. Considered a must for maintaining and improving flexibility, the benefits are often questioned elsewhere. In medicine, current literature on stretching finds that one static stretch of 15-30 seconds per day is sufficient for most patients, but some require longer durations.
The potential of a warm-up and stretching routine in deterring muscular injury during physical activity is also questioned. However, certain techniques and protocols have shown a positive outcome on deterring injuries and as a result, a warm-up and stretching protocol should be implemented prior (within 15 minutes for most benefit) to physical activity.
All stretches presented here should be repeated between 3-6 times, holding each stretch for at least 30 seconds. If 30 seconds is too demanding, try with 15 seconds or less and work your way up.
Enjoy!
26. Finger by Finger Flexion
Finger by Finger Flexion With Assistance – Stretching – www.thehealthsciencejournal.com
Muscles involved: The extensor muscle corresponding to the finger being flexed
Instruction:
Like the 25 exercise in this series, Finger by Finger Flexion is done one finger at a time. Simply hold on to each finger individually with the opposite hand and go for a deep but gentle flexion. Make sure your wrist remains flexed at approximately 90°.
Commentary:
During the exercise, flex the wrist slightly with each pull of the finger in order to put even greater emphasis on the tension. As in all other stretching exercises, the movement here should also be slow and controlled.
[adinserter block=”2″]
27. Finger Separation Stretch
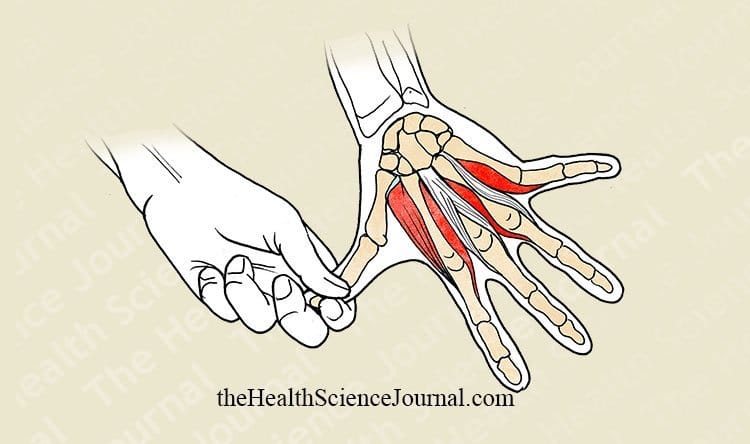
Finger Separation – Stretching – www.thehealthsciencejournal.com
Muscles involved: Palmar interosseous, dorsal interosseous of the thumb
Instruction:
This exercise is especially recommended for musicians playing the piano, guitar, flute, etc. With the help of the opposite hand, separate the fingers from each other, one by one. An alternative is to place an object like a cylinder or a rubber ball between the fingers and press it using the other hand towards the interdigital spaces of each finger. Some small muscles of the hand, the palmar interosseous for example, respond very well to this alternative.
Commentary:
Although the easiest one to separate may be the thumb (it’s called the opposing finger for a reason), the work should involve the entire hand.
Certain professions and hobbies demand excellent finger mobility, especially in the artistic fields. For example, musicians who play instruments where finger work is important will all benefit from this exercise, which they should practice conscientiously.
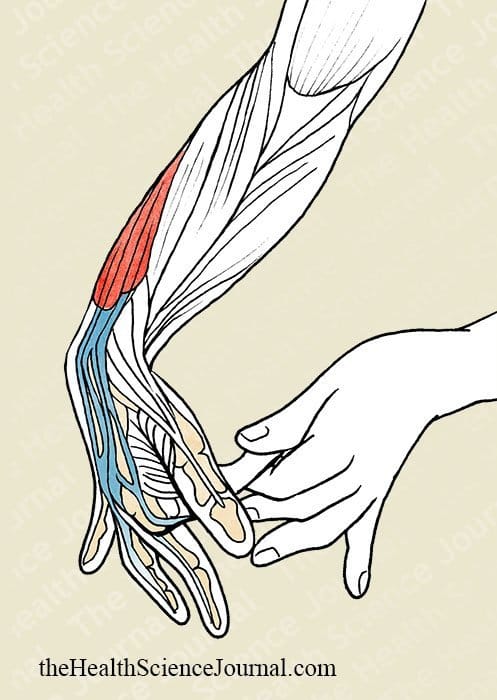
28. Hand Adduction With Extended Elbow
Hand Adduction With Extended Elbow – Stretching – www.thehealthsciencejournal.com
Muscles involved: Extensor carpi radialis longus, abducens pollicis
Instruction:
Adduction is simply the movement of a body part toward the body’s midline. Preferably standing up, extend your arm at the elbow completely and while keeping the hand adducted (the little finger is brought closer toward the forearm) press on the area of the thumb with your opposite hand.
Commentary:
By keeping the elbow extended you are working all of the target muscles, otherwise you’d be focusing mostly on the muscles surrounding the fingers. Let’s not forget that some of the muscles being stretched in this exercise are bi-jointed, meaning they cross both the elbow and the wrist.
29. Hand Pronation With Extended Elbow

Hand Pronation With Extended Elbow – Stretching – www.thehealthsciencejournal.com
Muscles involved: Supinator, abducens pollicis longus, extensor pollicis longus
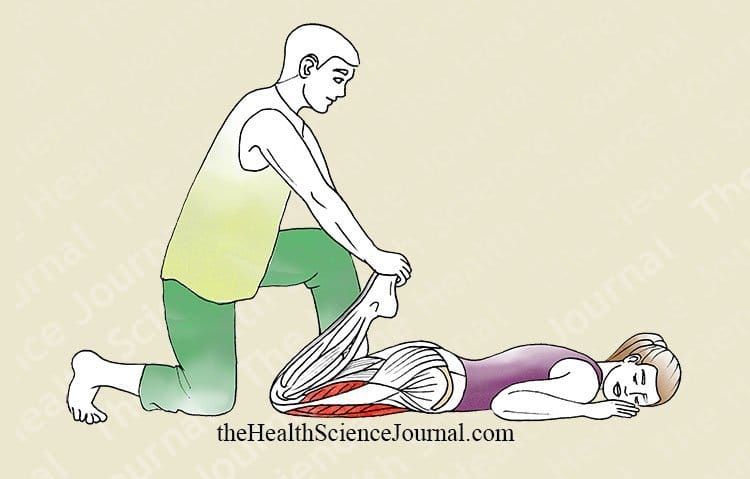
Instruction:
As with the previous exercise, we start standing up by extending our elbow completely and putting the hand in a pronated position (it is turned as if pouring a pitcher of water), helping the downward-inside movement with the opposite hand.
Commentary:
Stretching the target muscles here is not easy because natural bone limits usually prevent it. This is why in this exercise we combine two movements in order to take the muscles to their maximum extension. Our pain rule applies here as well – if you feel pain you are taking things too far.
One interesting point to note is that pronation and supination of the forearm are not generated by the wrist, as it first appears. The wrist, in fact, lacks these two movements. The rotation is produced from the elbow, and it involves both the arm and the forearm muscles.
[adinserter block=”3″]
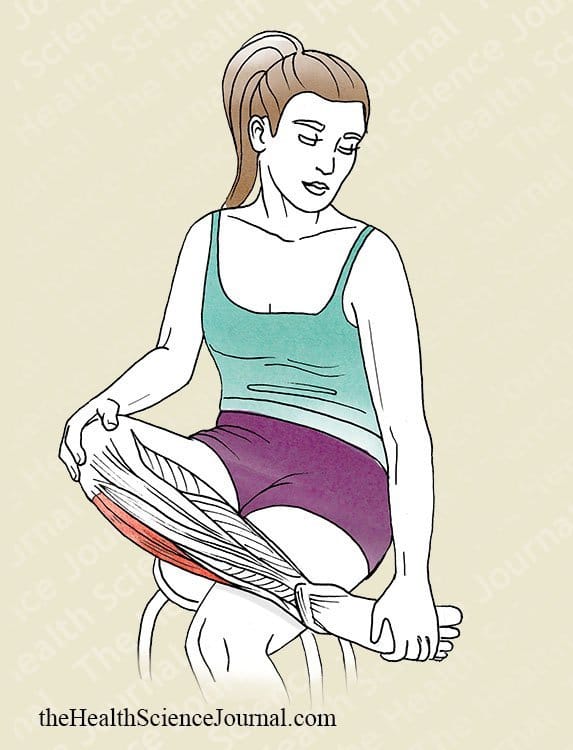
30. Standing Quadriceps Stretch
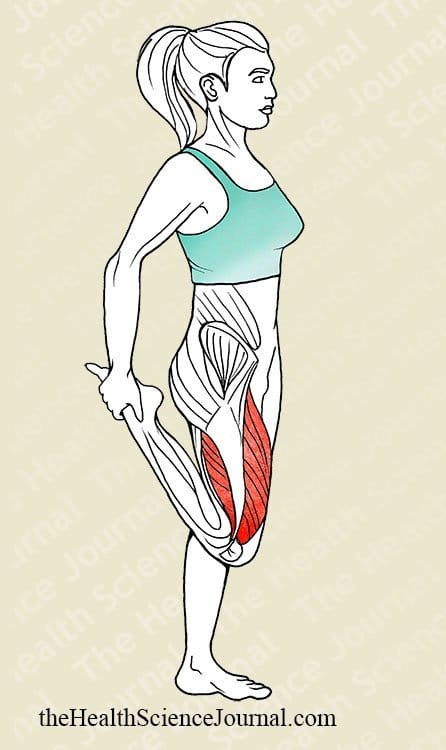
Standing Quadriceps Stretch – Stretching – www.thehealthsciencejournal.com
Muscles involved: Quadriceps
Instruction:
Standing up (while leaning against a support for balance) flex your knee and hold on to the front of the ankle-joint (the dorsal medial aspect of the foot), raised using the hand on the same side of the body as the flexed leg (left leg with left arm and right leg with right arm). By pressing the heel of the foot against the glutes, you will stretch your quadriceps.
Commentary:
The hip should not be flexed, nor should you lean the torso, but if you extend the hip a little bit backwards on the side that is being worked, you can get a good stretch on one portion of the quadriceps, the bi-jointed rectus femoris.
On the other hand, if the hip moves in the opposite way (raising the knee in front of the body but maintaining the rest of the posture as is) you will be putting emphasis on the vastus lateralis and medialis of the quadriceps, taking some tension off the rectus femoris.
31. Seated Quadriceps Stretch

Seated Quadriceps Stretch – Stretching – www.thehealthsciencejournal.com
Muscles involved: Quadriceps
Instruction:
Seating on top of your heels, preferably upon a padded surface, extend the hip allowing the trunk to fall backwards in a controlled fashion.
Commentary:
In this exercise, leaning the body backwards extends the quadriceps. This position also makes the hip flexors participate.
While an effective exercise, if the discomfort inherent with this position troubles you, feel free to skip it as the muscles worked may be stretched with other more comfortable and effective exercises.
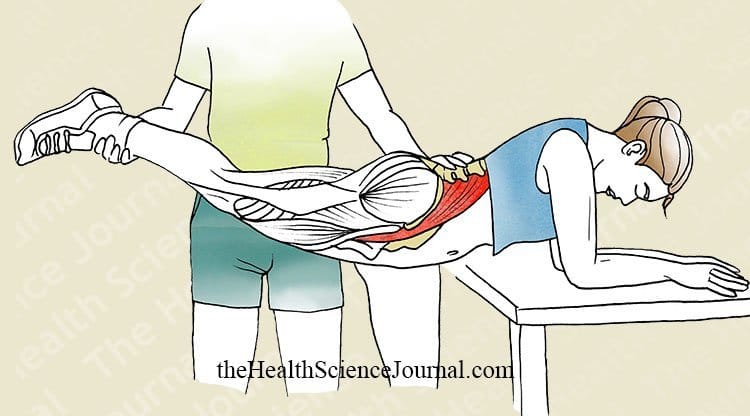
32. Quadriceps Stretch With Assistance
Quadriceps Stretch With Assistance – Stretching – www.thehealthsciencejournal.com
Muscles involved: Quadriceps
Instruction:
The person performing the stretch lies down in a decubitus prone position, flexing at the knees. The assisting partner presses upon the metatarsals of his feet, bringing them closer to the gluteus.
Commentary:
The risk of injury here is also almost nonexistent. The majority of people will notice that they are able to touch their gluteus with their heels. Therefore, the partner can use his/her full bodyweight upon the person stretching, who at no point should feel any pain.
33. Soleus Stretch
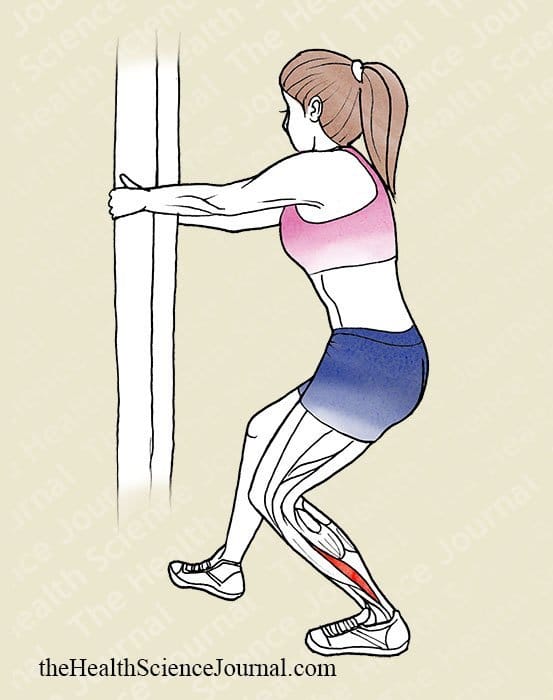
Soleus Stretch With Semi-flexed Knee – Stretching – www.thehealthsciencejournal.com
Muscles involved: Soleus
Instruction:
Standing and holding on to a support, push one leg backward and – with the knee semi flexed – plant the entire sole of the foot on the ground in such a way that the tension is felt in the area of the soleus (below the gastrocnemius). The forward leg remains in semi-flexion, supporting the weight of the body.
Commentary:
It’s important to keep the knee in flexion in order to place more emphasis on stretching the soleus. Note: the point of maximum stretch is achieved by gently placing the heel of the back leg on the ground. The most common way of adjusting the tension over the soleus is to gradually bring the knee closer to the wall without lifting the heel off the ground.
34. Seated Hamstring, Gastrocnemius and Soleus Stretch
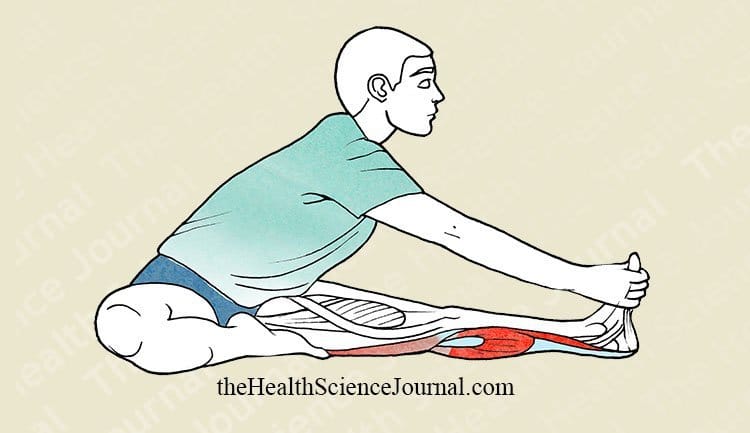
Seated Hamstring, Gastrocnemius and Soleus Stretch – Stretching – www.thehealthsciencejournal.com
Muscles involved: Ischiotibial muscles, gastrocnemius, soleus
Instruction:
Seating on the ground flex one leg over itself by bending the knee and resting the heel of the foot upon the adductor muscles of the opposite leg. The leg that is being stretched must remain with the knee extended. Now from this position, flex the hip slowly, lowering the trunk toward the outstretched leg.
Commentary:
During the exercise, the spinal column and the head must remain aligned. People with limited flexibility tend to flex the trunk over itself, believing that they are stretching the hamstring by getting closer to the front leg, which should be avoided.
35. Stride – Iliopsoas Stretch
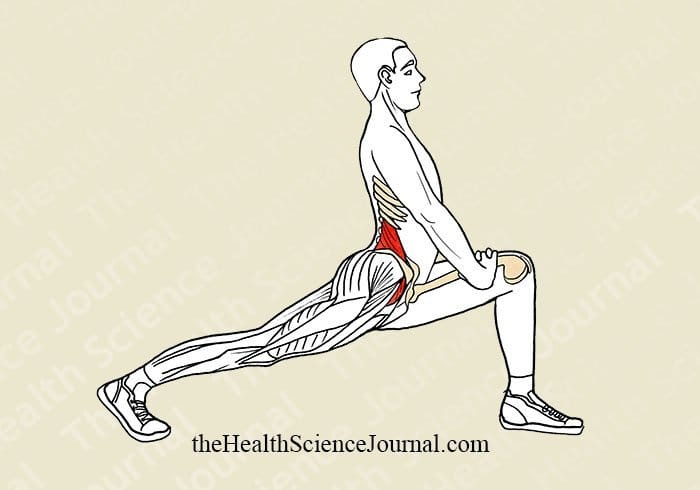
Stride – Stretching – www.thehealthsciencejournal.com
Muscles involved: iliopsoas
Instruction:
From a standing position, bring the body forward with a great stride without lifting the back foot off the ground. From this position, flex the back knee transferring most of the bodyweight to the front leg. The front knee must remain in a position just above the foot, never going beyond it. You can gently lower the weight of the trunk vertically by bringing the pelvis toward the floor to increase the stretch.
Commentary:
With this simple exercise we can really work the hip flexors. To keep balance, you can rest your hands on the front leg or a side bench, as balance is vitally important in order to be able to perform the exercise correctly.
If we had to choose only one exercise to stretch the iliopsoas, this would be it, because of its simplicity and effectiveness.
36. Iliopsoas Stretch With Assistance
Iliopsoas Stretch With Assistance – Stretching – www.thehealthsciencejournal.com
Muscles involved: Iliopsoas
Instruction:
Assume a position lying with the stomach over a bench or table in a decubitus prone position with the hip remaining at the edge, while the training partner raises one of your legs in extension.
Commentary:
Please note that the partner here must have the necessary strength to assist as he will have the weight of the leg and the tension of the muscles being worked against him. Furthermore, if all of the flexor muscles of the hip are not relaxed, the difficulty for applying the right level of tension will be that much greater for the partner.
[adinserter block=”4″]
37. Lying Glutes Stretch
Lying Glutes Stretch – Stretching – www.thehealthsciencejournal.com
Muscles involved: Gluteus maximus
Lying on the ground, flex one leg at both the hip and the knee and “hug” it with both hands, pressing the leg against the chest. The other leg remains extended on the ground.
Commentary:
This fairly simple exercise stretches the glutes of the elevated leg, but the hip flexors of the extended leg are also stretched. People with lower degree of flexibility will notice how the leg that should remain on the ground naturally lifts up, something that should be avoided (for example, by placing the foot under a bar).
In this exercise, the assistance of a partner could be quite useful. The partner presses the elevated leg against the chest of the person stretching, while at the same time holding the opposite leg down on the floor (at the level of the tibia) in such a way that the leg is held down but not pressured.
38. Lying Glutes Stretch With Assistance

Lying Glutes Stretch With Assistance – Stretching – www.thehealthsciencejournal.com
Muscles involved: Gluteus maximus
Instruction:
The person stretching lies on the floor on his back (in a decubitus supine position), preferably over a pad. He/she brings the legs together and flexes the hip and the knees. The training partner presses the knees against his partner`s chest, applying pushing force over the tibial region.
Commentary:
The training partner should not hold back and can press a great portion of his bodyweight upon the legs of the person performing the stretch. This is an exercise with a low risk of injury and/or feeling pain. The only precaution will be to keep in mind that the pelvis should not lift off the floor in order to maintain good stability in the spinal column.
39. Standing Glutes Stretch
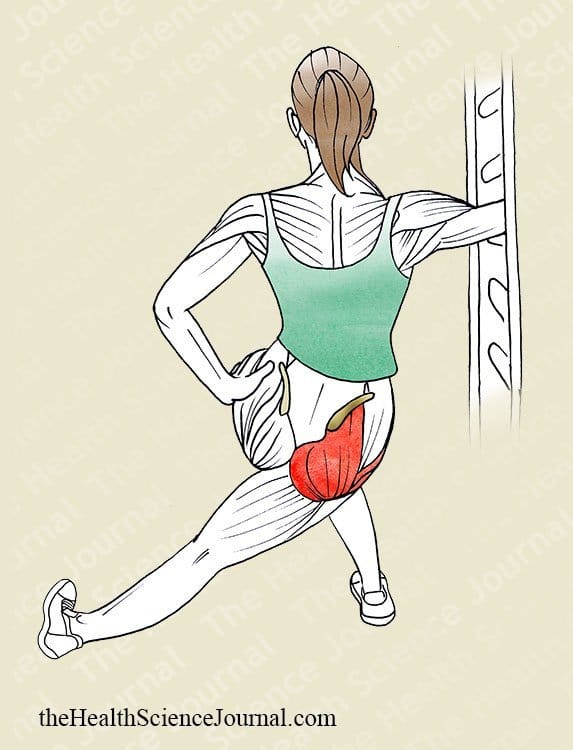
Standing Glutes Stretch – Stretching – www.thehealthsciencejournal.com
Muscles involved: Gluteal deltoids (superficial fibers of the gluteus maximus and tensor fascia lata)
Instruction:
Standing up, holding on to a support on the side, release the weight of the body from the leg closest to the support and cross it in adduction behind the leg that remains firmly in place. Lower the body slowly at the same time that the free leg is moved into greater adduction.
Commentary:
Although you will feel significant tension in the area of the gluteus medius and quadriceps in the leg that supports the bodyweight, these are postural tensions rather than true stretches. The leg that you are actually stretching is the one that was crossed over.
One thing to note is that the torso must remain firm and vertical, never leaning, as that would detract from the effectiveness of the exercise. When performed correctly, you will notice a tension running along the entire lateral area of the leg, from the hip all the way to the knee.
40. Foot Sole Stretch (Plantar Stretch)

Foot Sole Stretch – Stretching – www.thehealthsciencejournal.com
Muscles involved: Flexor digitorum longus and flexor digitorum brevis
Instruction:
While seated, flex the foot toward the tibia with the help of the hand. The hand covers a great part of the sole of the foot in order to produce a general flexion. If the flexion is performed with the knee extended, the stretch will focus on the gastrocnemius and soleus muscles, whereas if the knee is flexed it will focus more on the latter.
Commentary:
On the other hand, if the traction is solely upon the toes, the intensity of the stretch will be greatest upon the flexor digitorum longus and brevis, as well as the lumbricals. All these different variations should be performed to ensure that they are all properly stretched.
41. Toes Separation
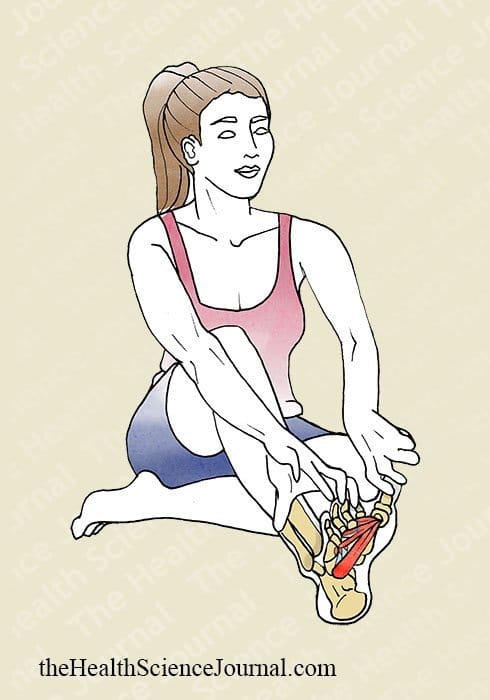
Toes Separation – Stretching – www.thehealthsciencejournal.com
Muscles involved: Plantar interosseous, adductor hallucis
Instruction:
This exercise consists of separating each pair of toes one by one with the help of the hands. This is extremely useful when we wear footwear that will press upon or immobilize the toes. Toes Separation is important for regaining the lost mobility. Maybe the most use fro this stretch will have women wearing high heels or tight shoes on daily basis.
Commentary:
Walking around barefoot, especially on the sand at the beach, can be a pleasant and valid alternative, although not as specific or as strict as moving each toe individually. Keep in mind that footwear should never harm the toes, ankle or any other part of the body. Poor support will have repercussions in many other areas (the knees, hips, spine, etc…).
42. Ankle Mobilization (Peroneal Stretch)
Ankle Mobilization – Stretching – www.thehealthsciencejournal.com
Muscles involved: Peroneus
Instruction:
While seated, place one foot across the other leg. Move the raised foot in such a way as to cause the stretching of its different muscles. Change the position of flexion and extension of the ankle to reach different muscles. Each stretching position must be held for a few seconds, not just simply turning the foot in all different directions (circumduction). Rather adopt a position of tension and hold it for a time and then change to a different one.
Commentary:
The ankle, along with the knee, is one of the most fragile joints when it comes to practicing sports. Its strengthening, stretching, and proprioception are essential for a healthy joint and for preventing problems in the future. In this exercise, it is necessary to know how to relax the different muscles that surround the ankle, since any tension will take away from the effectiveness of the stretching exercise.
43. Hamstring Stretch With Assistance
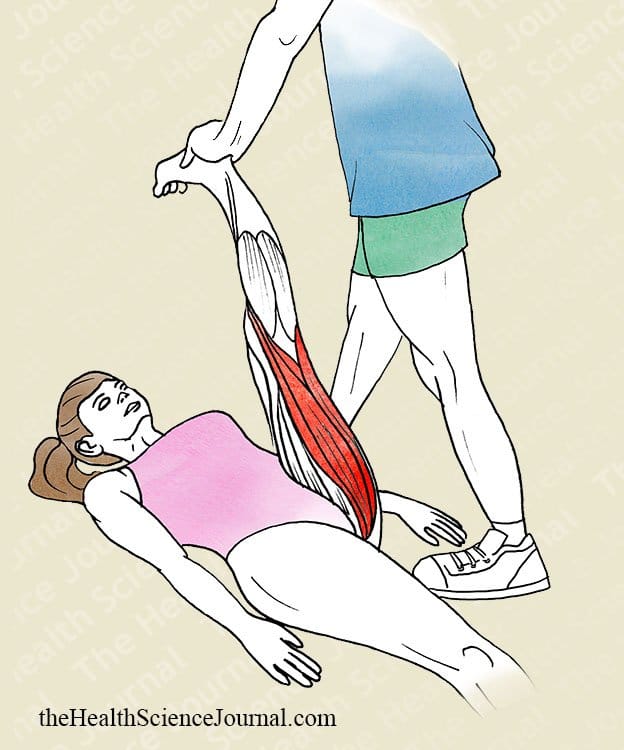
Hip Flexion With Assistance – Stretching – www.thehealthsciencejournal.com
Muscles involved: Ischiotibial muscles
Instruction:
Lie down on the floor, preferably over a padded mat. Let your training partner take one of your legs and, with the knee always extended, raise it over your body by flexion at the hip.
Commentary:
Less flexible people will have difficulty keeping the other leg on the ground, and they will quickly notice how their iliopsoas muscle also pulls to flex the hip. The training partner must watch out so that this does not occur, placing one of his feet on top of the outstretched leg if necessary.
44. Thigh Stretch With Assistance
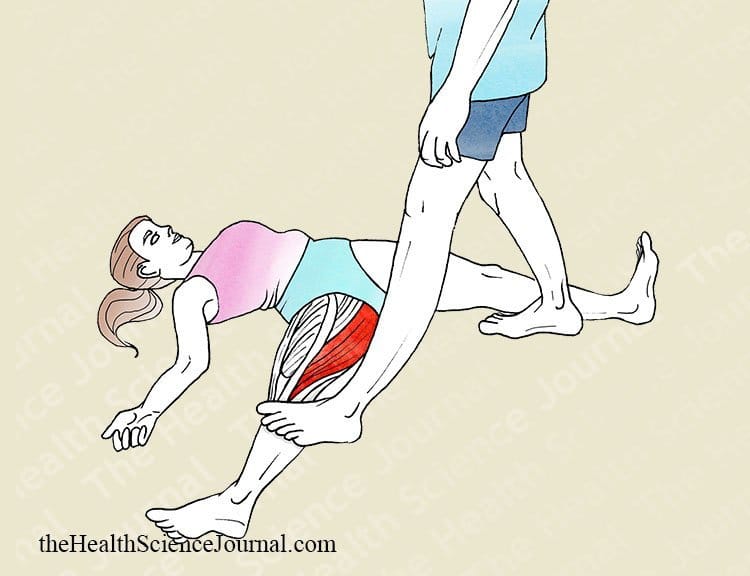
Abduction of One Leg With Assistance – Stretching – www.thehealthsciencejournal.com
Muscles involved: Adductors, gracilis
Instruction:
Lie on the ground with the training partner standing between the legs at the level of your knees. The partner places one foot firmly on the ground immobilizing one of the legs of the person executing the stretch, and with the other foot opens the leg in abduction.
Commentary:
During the exercise the partner tries to always keep the knees extended thus stretching both the adductors and the knee flexors. The pressure opening the leg is applied at the knee, avoiding unnecessary tensions of the knee ligaments.
45. Lying Rectus Abdominis Stretch
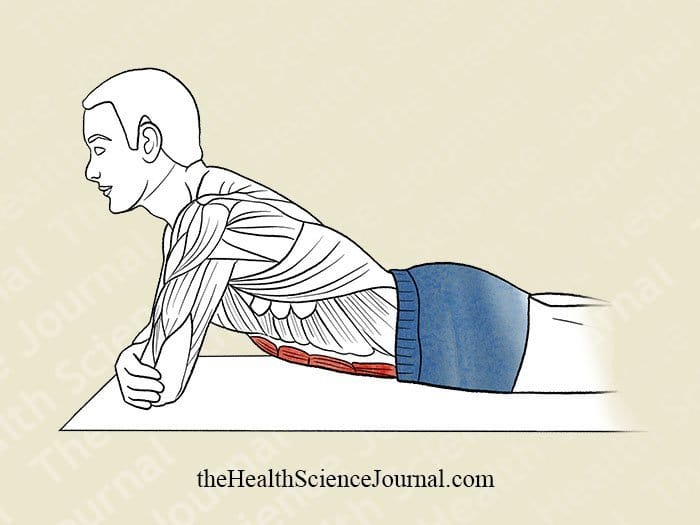
Chest Elevation Over Elbows – Stretching – www.thehealthsciencejournal.com
Muscles involved: Rectus abdominis
Instruction:
Lying in decubitus prone position, elevate your chest supporting yourself over the elbows so that you feel a gentle tension over the abdomen.
Commentary:
The rectus abdominis is a muscle that does not require a lot of stretching and doing this stretch periodically is quite enough to sufficiently exercise it.
46. Standing Rectus Abdominis Stretch
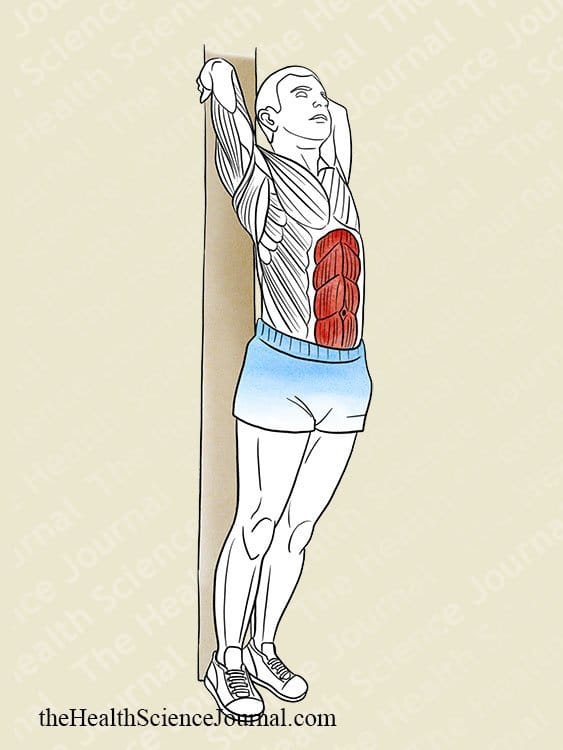
Hip Extension With Back to a Support – Stretching – www.thehealthsciencejournal.com
Muscles involved: Rectus abdominis
Instruction:
With your back to a column or other support, hold on with your hands over the head and without moving the feet let your body fall forward lightly.
Commentary:
We like this specific exercise because it not only provides enough of a stretch of the abs, but other important muscles like the latissimus dorsi and the triceps as well. Remember to always keep your body in a relaxed a position.
47. Lying Side Bends
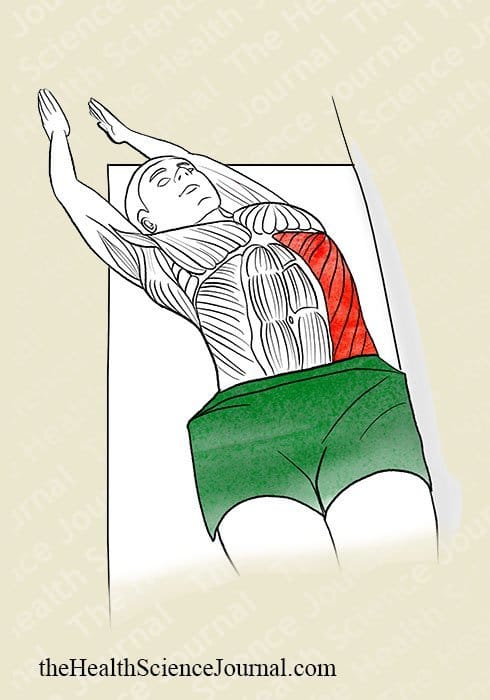
Lying Side Bends – Stretching – www.thehealthsciencejournal.com
Muscles involved: Abdominal obliques, latissimus dorsi, quadratus lumborum
Instruction:
Beginning from a decubitus supine position with one side of the body supported against a wall, bend towards the opposite side while keeping the legs and the hip touching the wall.
Commentary:
By raising the hand you are involving the latissimus dorsi and the teres major as well. If not, the stretch will be focused on the abdomen. Use the wall only as a reference keeping the legs and the hip immobile during the exercise.
48. Lateral Bends With a Partner
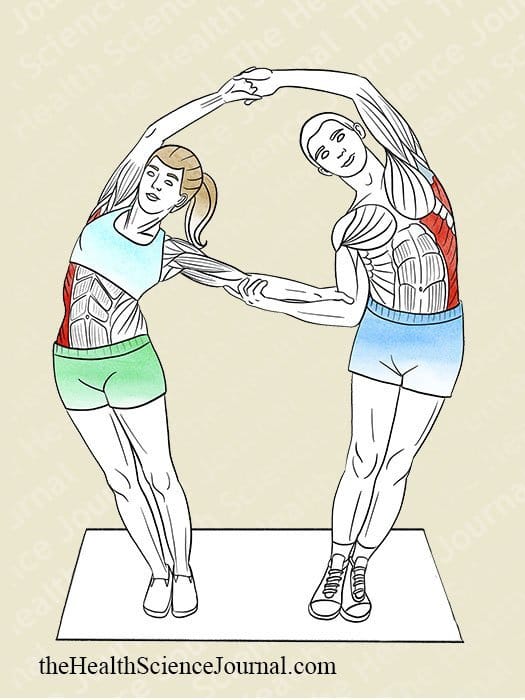
Lateral Bends With a Partner – Stretching – www.thehealthsciencejournal.com
Muscles involved: Abdominal obliques, latissimus dorsi, quadratus lumborum
Instruction:
Standing side by side with a training partner, holding each other`s forearm on the closer side and the hands of the other side above the head. From this position, let yourself gently fall away from your training partner.
Commentary:
It is preferable that the training partners are with a similar height and weight, else the posture will be too uncomfortable and ineffective. The aim here is to stretch the entire lateral area (gluteus medius, obliques, latissimus dorsi).
49. Cat Cow
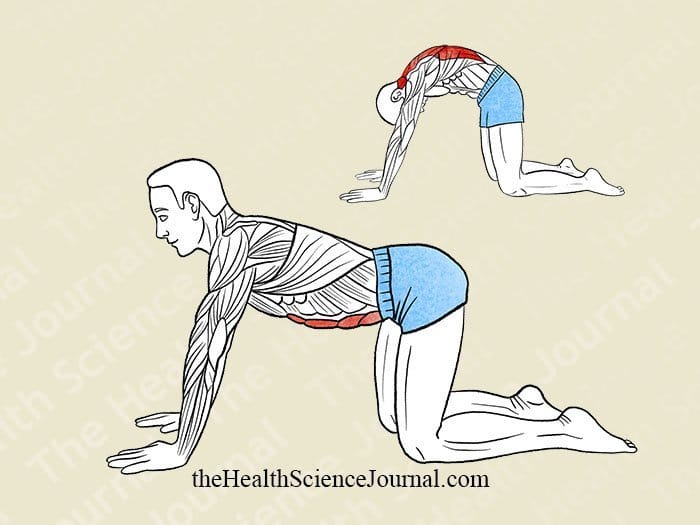
Cat Cow – Stretching – www.thehealthsciencejournal.com
Muscles involved: Rectus abdominus, group of spinal erectors
Instruction:
Standing on both hands and knees, contract the abdomen in order to curve the spine. From that position, relax and press the torso down to create the opposite curvature. Next, take a deep breath and extend the abdomen, then exhale to contract it.
Commentary:
Cat Cow is an exercise for mobility of the spinal column and the minor muscles that surround it. Note the importance of distending the vertebral column, especially in the lumbar region.
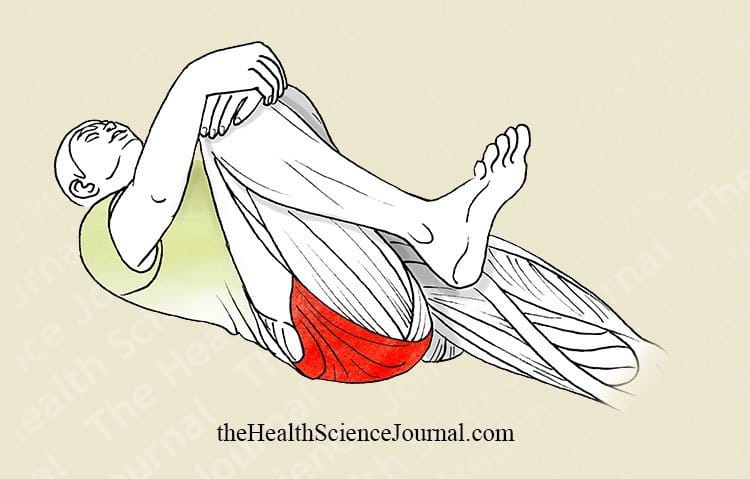
50. Spine Mobility Stretch
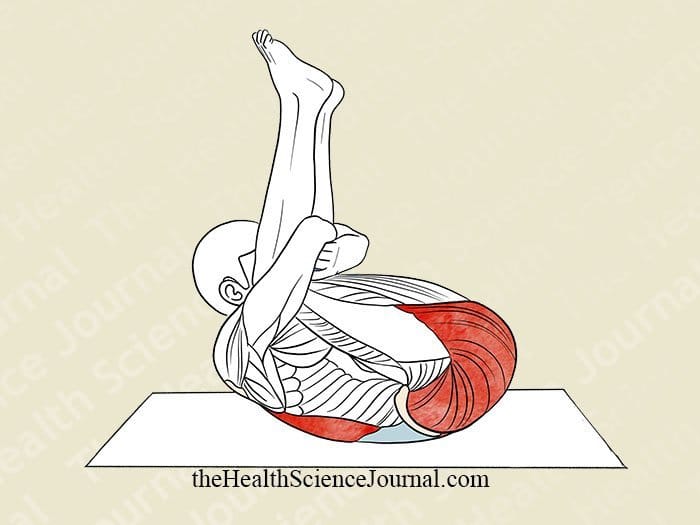
Spine Mobility Stretch – Stretching – www.thehealthsciencejournal.com
Muscles involved: Gluteus maximus and medius, M. iliocostalis
Instruction:
Starting from a lying supine position, lift your legs and embrace them (making a curve), but without compromising the cervical spine (neck). Relax and keep the position.
Commentary:
This exercise is intended for mobility of the spine and the small muscles surrounding it. The important thing is to distend the spine, especially in the lumbar area.
51. Twists With Assistance
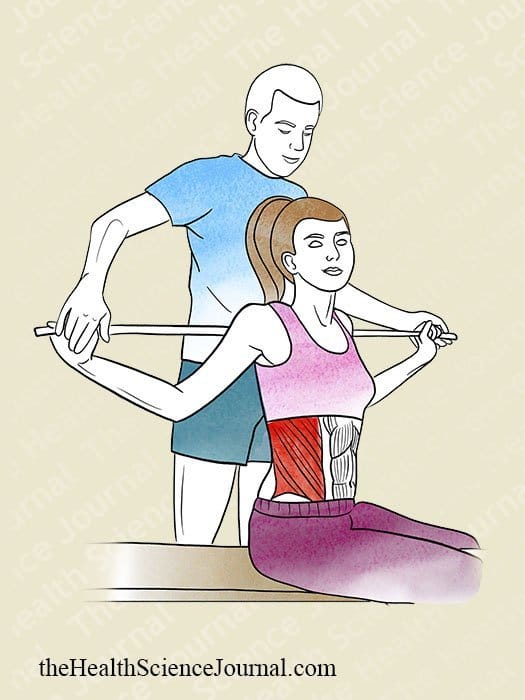
Twists With Assistance – Stretching – www.thehealthsciencejournal.com
Muscles involved: Abdominal obliques
Instruction:
Seated on a flat bench hold on to a wooden bar across the shoulders while the training partner stands behind you also holding the bar. Both of you slowly turn the trunk to one side until a full tension is felt. Relax back to the starting position before repeating on the opposite side.
Commentary:
Due to the tension of the rotator muscles, this exercise could not be performed effectively without assistance. For the greatest effect, the person stretching must relax the abdominal area and exhale on the turn so that the partner can do his part correctly. When stretching alone, you can place the hands behind the head and perform the exercise by yourself.
52. Lateral Bends on a Mat
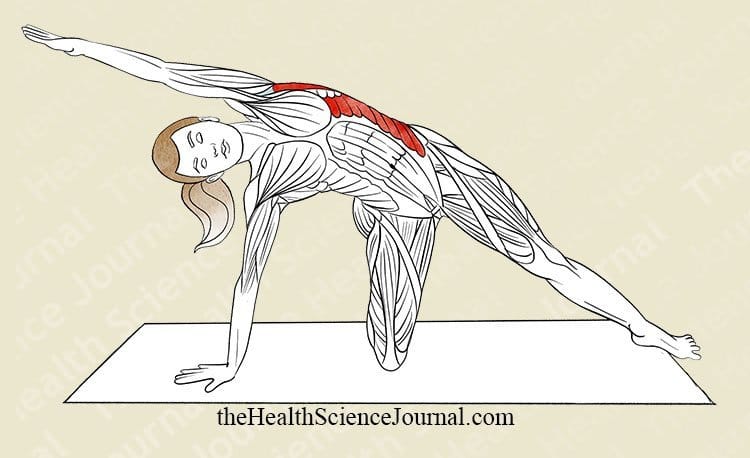
Lateral Bends on a Mat – Stretching – www.thehealthsciencejournal.com
Muscles involved: Abdominal obliques, latissimus dorsi, quadratus lumborum
Instruction:
Sitting on your heels, extend one leg to the side while the arm on the same side is raised. Take the raised arm to its utmost lateral extension, while keeping the opposing hand on the ground to the side.
Commentary:
This stretch should be felt all along the side of the body. If you don’t feel it, try separating as much as possible the hand and the foot from the side being stretched.
53. Padded Mat Support Stretch
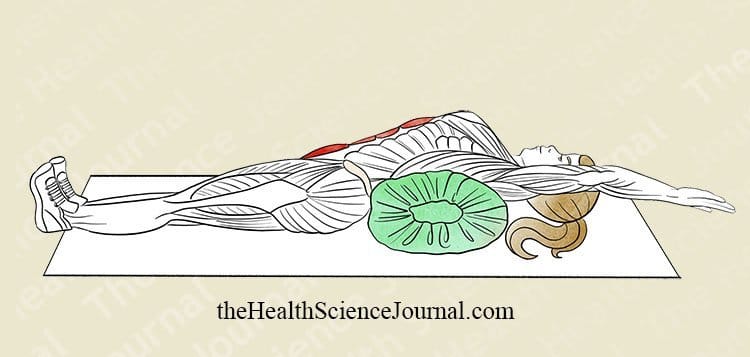
Padded Mat Support Stretch – Stretching – www.thehealthsciencejournal.com
Muscles involved: Rectus abdominus
Secondary: Abdominal obliques (major and minor), transversus abdominis, latissimus dorsi
Instruction:
Place a padded mat on the ground (a towel can also be used) and lie down on your back on top of it so that it is located underneath the lumbar region. Next, extend the arms over the head and try to stretching as much as possible.
Commentary:
This simple exercise is appropriate for those people who suffer from posture-related pain of the muscles of the spinal column. The only precaution is that the padding must be adequate, since one that is too high and/or too hard could be uncomfortable, and it would be quite ineffective. This is a stretch that, because of its simplicity and comfort, can be performed by people who have difficulties with movement as well as by the elderly.
The variation that is performed without the padding can also be done, but in this case the objective is to be able to maintain the lower back firmly pressed against the ground, followed by relaxation. The posture for this variation should be with the legs flexed and the bottoms of the feet planted on the floor; from that position, press the lumbar region downward and relax it after a few seconds.
Interestingly, a variation of this stretch is quite popular in Japan as a way to improve your posture and even lose weight!
This concludes our Starting Stretching program. Hope you enjoyed it and don’t forget to share if you did! Once again, to find the first part of Starting Stretching along with workout instructions and a muscle chart, please visit Starting Stretching – 53 Full Body Stretches for Beginners, Part 1.
Cheers!
1 comment
Absolutely brilliant, thank you so much.
Comments are closed.