
The human heart is an incredible organ despite it being only 8 to 10 ounces in weight. Every day, the heart beats around 100,000 times to pump roughly 2,000 gallons of your blood through the thousands of miles of blood vessels throughout your body.
Sudden cardiac death, which can occur due to cardiac arrest without medical intervention, claims the lives of more than 350,000 adults and children every year in the United States. Intervening with the right kind of care at precisely the right moment can make all the difference. Delivering a jolt of electricity to the heart during cardiac arrest with an Automated External Defibrillator (AED) within one minute means an individual has a 90 percent chance of surviving.
While efforts have been made to make AEDs available in public locations so bystanders can step in during a cardiac event, many people don’t know how to use the devices. Contrary to popular belief, you don’t actually have to have any type of formal training to use an AED. Modern devices are specifically designed for ease of use. In fact, an AED will not deliver a shock if the individual in question does not need the treatment.
If you’re ever in a situation where you need to use an AED, it’s important to be prepared. That’s why we’ve put together this simple five-step guide to explain how to save a life with an AED.
1. Power Up the AED
Once you have found the AED unit, look for a clear button to power on the unit. If you have not yet called for help, be sure to call 9-1-1 right away or ask a bystander to call 9-1-1 for you so emergency personnel can be on the way to assist as soon as possible. Once powered on, most AEDs will give you further directions either with audible voice via a speaker or on a digitized or video screen.
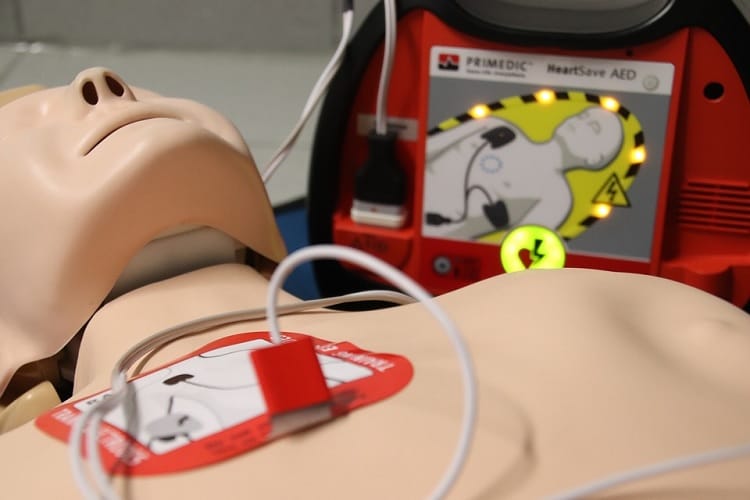
2. Find the Defibrillator Pads on the Unit and Place Them
Defibrillator pads are attached to the patient’s chest and connected to the AED. Look for these pads on the unit you are using. Most often, the pads will be attached to the unit in some way, such as on the backside of the device. They will be concealed in packages and may have pictures to show you where they should be placed. To place the pads on the patient:
- Remove the outer packaging
- Remove all types of clothing from the patient’s chest
- Place the pads on the chest according to directions on the package
- Press the pads firmly, so they adhere to the skin
The most preferred placement for defibrillation pads is to place one pad on the right side of the chest just beneath the collar bone and place the other pad on the left side of the person’s body under the armpit.
3. Allow Time for Heart Rhythm Detection
With the defibrillation pads in place, the AED machine will analyze the patient for a heartbeat and the heart’s rhythm. Depending on the unit being used, the machine may actually announce “analyzing heart rhythm, do not touch the patient.” Touching the patient or causing the patient to move can interfere with the unit’s ability to analyze the heart rhythm.
Once the AED has analyzed heart rhythm, it will let you know if a shock is needed. For example, the machine may announce, “Shock Advised. Charging. Stand Clear.”
4. Announce Your Intentions and Activate the Unit
While the machine is charging for shock delivery, which will only take a few seconds, let all bystanders know to “Stand Clear.” Look in both directions to make sure no one is touching the patient, including yourself. It is always a good idea to announce this twice to make sure no one is near the patient, so be sure to state “Stand Clear” loudly and repeat yourself as much as necessary. When the machine is charged and ready, it will tell you to press the shock button, which will likely be easy to find and possibly flashing.
5. Begin CPR and Follow Instructions on the Unit
After the AED has delivered the shock to the patient and alerted you it is safe to do so, you can begin providing CPR. Leave the defibrillation pads in place; these don’t interfere with CPR delivery, and you may have to deliver repeat shocks. Plus, some AEDs will give you an audible metronome that helps you provide chest compressions at accurate intervals. After giving CPR for two minutes, the AED unit will once again analyze heart rhythm to determine if the patient needs a second shock. If that happens to be the case, you will simply repeat the process: Announce “Stand Clear,” activate shock when guided to do so, and then repeat CPR.
Cardiac Emergencies Can Occur Anywhere or Anytime – Be Prepared to Save a Life
AED devices could easily be considered some of the most important medical devices to have around. Some of the most modern AED units, such as the Defibtech Lifeline View AED, even offer full-motion, color video to guide a bystander through use. While an AED may not always be the answer, at the times when this life-saving intervention is available to a person in need, knowing how to use the device can truly be a saving grace.